Ever wanted to bake your own bread with that delightful tangy flavor? Creating your own sourdough starter is the first step to achieving that perfect loaf. This homemade starter is not just a recipe; it’s an exciting journey into the world of fermentation and artisan bread-making. Plus, it’s a fun science experiment that can be done right in your kitchen!
The beauty of a sourdough starter lies in its simplicity. With just flour and water, you can cultivate wild yeast and bacteria from the environment, transforming them into a bubbly and active mixture. Once you get your starter going, the possibilities for baking are endless, from rustic loaves to pancakes and waffles.
This sourdough starter will develop a unique flavor profile over time, enhancing your baked goods with a deliciously complex taste. It’s a living culture that thrives on regular feeding, making it a rewarding project for both beginner and seasoned bakers alike.
The Charm of a Sourdough Starter
Creating a sourdough starter is a rewarding project that links tradition with the joy of baking at home. The process begins simply, with just flour and water, but soon transforms into a lively culture filled with bubbles. This bubbling mixture is a testament to the wild yeast and bacteria that thrive in the environment, making it an essential component for artisan bread.
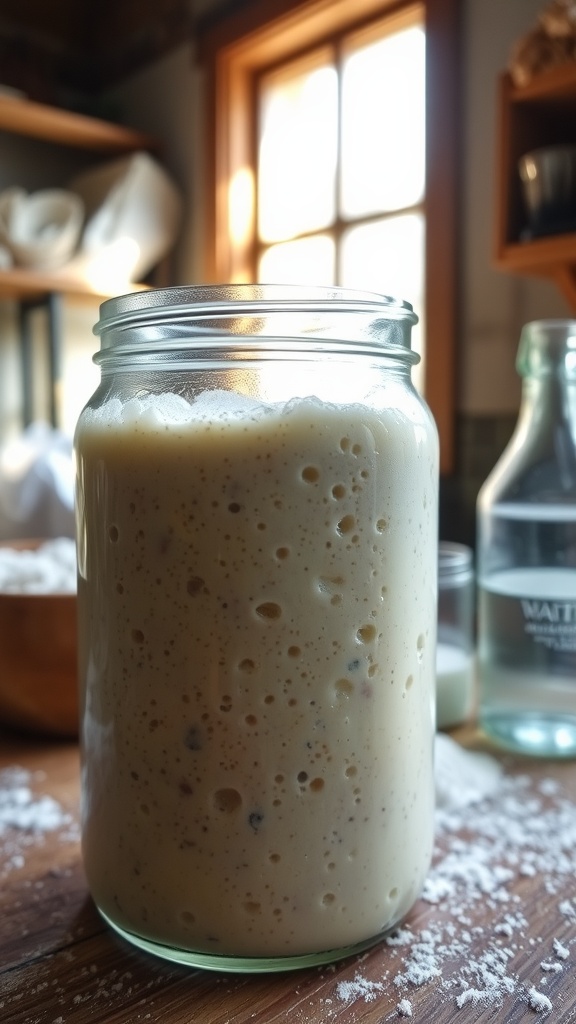
As the starter develops, it not only becomes a reliable ingredient for baking but also a source of pride for the baker. The visual appeal of a bubbling starter in a glass jar is captivating, showcasing the active fermentation process. Sunlight streaming through a kitchen window adds warmth to this scene, inviting anyone to join in the bread-making journey.
Ingredients for Success
The primary ingredients for a successful sourdough starter are quite simple. All-purpose or whole wheat flour serves as the foundation, while water acts as the catalyst for activating the natural yeast in the flour. This combination, mixed together, produces a thick, creamy texture—the hallmark of a healthy starter.
Regular feeding of the starter with additional flour and water is vital, ensuring that it remains robust and active. Over time, this simple mixture evolves into a complex culture that enhances the flavor profile of any bread it helps create.
The Fermentation Journey
Fermentation is the heart of sourdough baking. The initial mixing of flour and water sets off a fascinating transformation, as wild yeast begins to thrive. This process typically spans several days, allowing the starter to grow in bubbles and strength.
🦈 As Seen on Shark Tank: These Kitchen Gadgets Are Flying Off the Shelves!





Souper Cubes 1 Cup Silicone Freezer Molds with Lids, Aqua, 2-Pack
(as of August 6, 2026 18:05 GMT +00:00 - More infoEatMeMaybe is a participant in the Amazon Services LLC Associates Program, an affiliate advertising program designed to provide a means for sites to earn commission fees by advertising and linking to the following web sites.)




The Perfect Pizza Pack™ - Reusable Pizza Storage Container with 5 Microwavable Serving Trays - BPA-F...
(as of August 6, 2026 18:05 GMT +00:00 - More infoEatMeMaybe is a participant in the Amazon Services LLC Associates Program, an affiliate advertising program designed to provide a means for sites to earn commission fees by advertising and linking to the following web sites.)


OTOTO Splatypus Jar Spatula for Scooping and Scraping - Unique Fun Cooking Kitchen Gadgets for Foodi...
(as of August 6, 2026 18:05 GMT +00:00 - More infoEatMeMaybe is a participant in the Amazon Services LLC Associates Program, an affiliate advertising program designed to provide a means for sites to earn commission fees by advertising and linking to the following web sites.)As an Amazon Associate, I may earn a commission from qualifying purchases — at no extra cost to you.
Each day introduces new aromas and changes in texture, indicating the development of the starter. Observing these changes not only teaches patience but also provides a deeper appreciation for the science behind baking. By the end of the week, a vibrant, active starter awaits, ready to contribute to delicious bread.
Caring for Your Starter
Ongoing care is essential to maintaining a sourdough starter. Regular feedings every 24 hours ensure it remains lively and ready for baking. Discarding a portion of the starter before each feeding might seem wasteful, but it is crucial for keeping the culture healthy and balanced.
The tactile experience of mixing in fresh flour and water is fulfilling, as it connects the baker with the ingredients. Soon, the kitchen fills with the delightful scent of fermentation, signaling that the starter is thriving and preparing for its next baking adventure.
Flavors and Possibilities
A well-cultivated sourdough starter introduces a range of flavors to baked goods. The natural fermentation process adds depth, resulting in a crusty exterior and chewy interior in breads that are simply irresistible. Each loaf baked with this starter tells a story of its journey through time and care.
The possibilities don’t end with bread; a sourdough starter can elevate pancakes, waffles, and even pizza dough. The unique tanginess it imparts makes every dish special, transforming everyday meals into culinary experiences.
Creating a Warm Kitchen Atmosphere
A bubbling sourdough starter brings a rustic charm to any kitchen. The sight of it perched in a glass jar, surrounded by flour and water, creates an inviting scene that embodies the essence of home baking.
With sunlight filtering through the window, the kitchen becomes a cozy nook for experimentation and creativity. This warm atmosphere encourages bakers of all levels to engage with their craft and enjoy the process of creating something delicious from scratch.
The Art of Cultivating Your Sourdough Starter
This sourdough starter recipe produces a bubbly, tangy mixture that can be used for a variety of baking projects. It has a wonderful balance of acidity and sweetness, creating a rich flavor that elevates your homemade bread. The lengthy fermentation process adds depth, resulting in a crusty exterior and chewy interior in the bread that is simply irresistible.
Ingredients
- 1 cup all-purpose flour (or whole wheat flour)
- 1/2 cup water (filtered or bottled, room temperature)
- Additional flour and water for feeding (about 1/2 cup each every 24 hours)
Instructions
- Day 1: In a clean glass jar, mix 1 cup of flour with 1/2 cup of water until smooth. Cover loosely with a cloth or a lid and let it sit at room temperature (about 70°F or 21°C) for 24 hours.
- Day 2: Check for bubbles or a slight rise. Discard half of the starter (about 1/2 cup), and add another 1 cup of flour and 1/2 cup of water. Stir well, cover loosely, and let sit for another 24 hours.
- Days 3-7: Repeat the process of discarding half and feeding with equal parts flour and water every day. You should start to see more bubbles and a pleasant, sour smell developing.
- By day 7, your starter should be bubbly and doubled in size after feeding. It’s now ready to use for baking or to be stored in the fridge for later use.
Cook and Prep Times
- Prep Time: 5 minutes
- Fermentation Time: 7 days
- Total Time: 7 days + ongoing care
Nutrition Information
- Servings: Varies based on usage
- Calories: Approximately 100 calories per cup (starter)