These dessert recipes are all about getting hands-on in the kitchen and playing with flavors and textures. From creamy mousses to fluffy cakes, each recipe highlights different techniques that bring out the best in sweet treats. Whether you’re mixing, baking, or chilling, you’ll find plenty of inspiration to satisfy your sweet tooth and impress friends and family with your culinary skills.
Decadent Chocolate Lava Cake
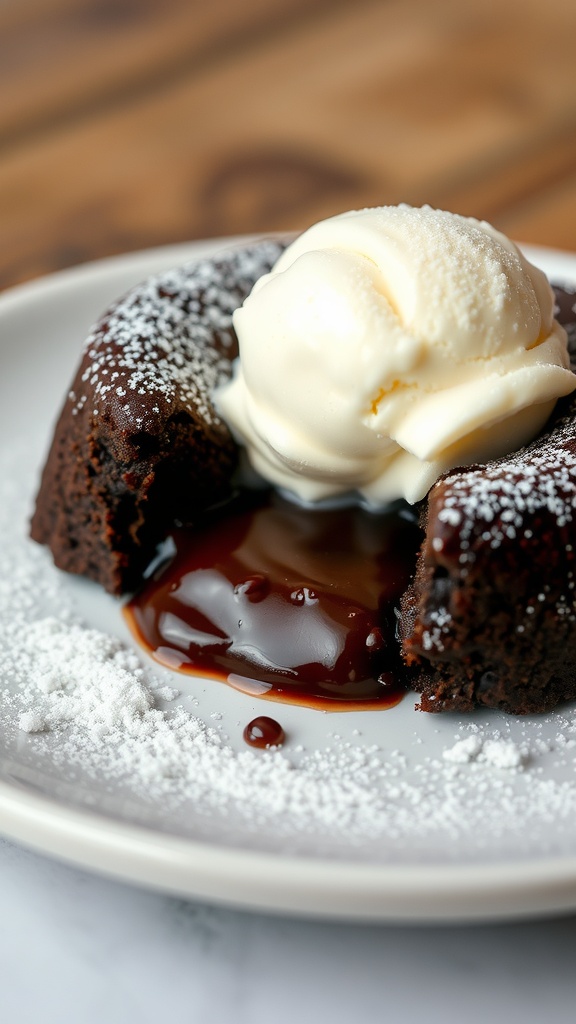
Chocolate lava cake is a delightful dessert that combines a rich, molten center with a soft, cake-like exterior. Each bite offers a warm, gooey chocolate experience that feels indulgent yet surprisingly simple to make. Perfect for impressing guests or treating yourself, this recipe is sure to satisfy any chocolate lover’s cravings.
The taste is a heavenly mix of rich chocolate and a hint of sweetness, making it a favorite for special occasions or a cozy night in. With just a few ingredients and minimal prep time, you can whip up this treat in no time!
Ingredients
- 1/2 cup unsalted butter
- 1 cup semi-sweet chocolate chips
- 2 large eggs
- 2 large egg yolks
- 1/4 cup granulated sugar
- 2 tablespoons all-purpose flour
- 1/4 teaspoon salt
- Powdered sugar for dusting
- Vanilla ice cream for serving (optional)
Instructions
- Preheat the oven to 425°F (220°C). Grease four ramekins with butter and dust with flour, tapping out the excess.
- In a microwave-safe bowl, melt the butter and chocolate chips together in 30-second intervals, stirring until smooth.
- In another bowl, whisk together the eggs, egg yolks, and granulated sugar until thick and pale. Stir in the melted chocolate mixture.
- Gently fold in the flour and salt until just combined.
- Divide the batter evenly among the prepared ramekins. Place them on a baking sheet.
- Bake for 12-14 minutes, until the edges are firm but the center is soft. Let cool for 1 minute.
- Carefully invert each ramekin onto a plate. Dust with powdered sugar and serve warm with a scoop of vanilla ice cream if desired.
Peanut Butter Cup Cheesecake Bars
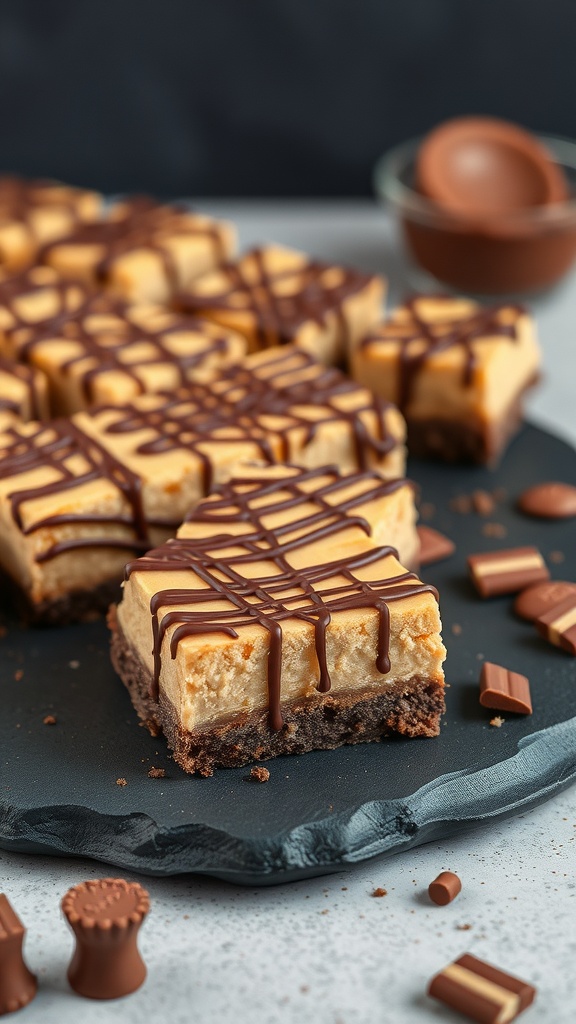
These Peanut Butter Cup Cheesecake Bars are a delightful treat that combines creamy cheesecake with the rich flavor of peanut butter and chocolate. They have a smooth texture and a sweet, nutty taste that makes them irresistible. Plus, they are simple to whip up, making them perfect for any occasion!
With a cookie crust and a topping of melted chocolate, these bars are sure to satisfy your sweet tooth. They are great for sharing at parties or enjoying as a sweet snack at home. Get ready to impress your friends and family with this easy recipe!
Ingredients
- 1 1/2 cups chocolate cookie crumbs
- 1/4 cup unsalted butter, melted
- 16 oz cream cheese, softened
- 1 cup granulated sugar
- 1 cup creamy peanut butter
- 3 large eggs
- 1 teaspoon vanilla extract
- 1 cup mini peanut butter cups, chopped
- 1/2 cup semi-sweet chocolate chips
Instructions
- Preheat the oven to 325°F (160°C). Line a 9×9-inch baking pan with parchment paper.
- In a bowl, mix chocolate cookie crumbs and melted butter until combined. Press the mixture into the bottom of the prepared pan to form the crust.
- In a large mixing bowl, beat the cream cheese and sugar until smooth. Add the peanut butter, eggs, and vanilla extract, mixing until well combined.
- Fold in the chopped peanut butter cups gently into the cheesecake mixture.
- Pour the cheesecake mixture over the crust in the baking pan. Smooth the top with a spatula.
- Bake for 30-35 minutes or until the center is set. Remove from the oven and let cool completely.
- Once cooled, melt the chocolate chips and drizzle over the top of the cheesecake bars. Chill in the refrigerator for at least 2 hours before slicing.
- Cut into squares and enjoy your delicious Peanut Butter Cup Cheesecake Bars!
Homemade Strawberry Shortcake with Whipped Cream
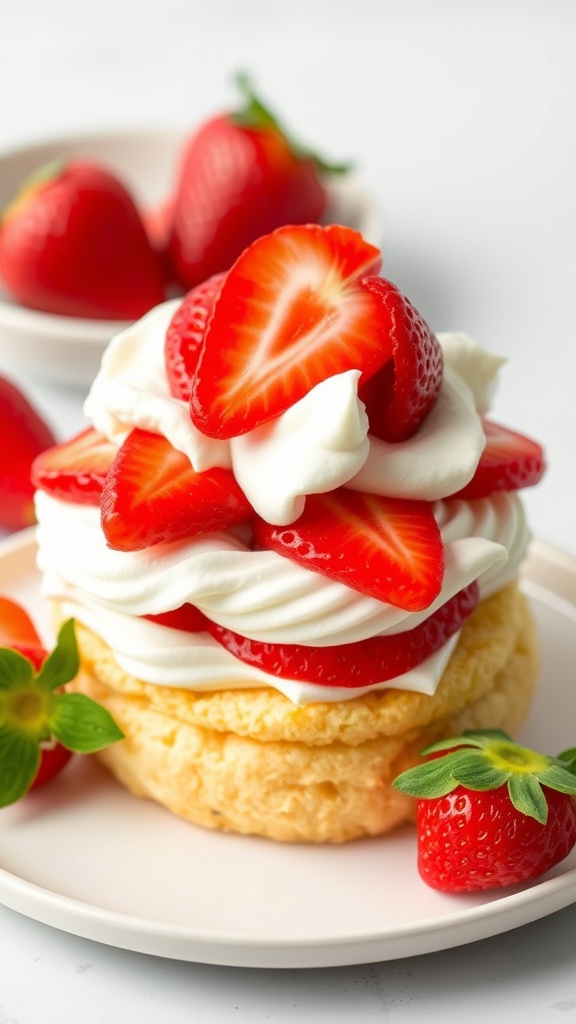
Homemade strawberry shortcake is a delightful treat that combines fluffy biscuits, fresh strawberries, and whipped cream. The sweetness of the strawberries pairs perfectly with the light and airy texture of the cake, making each bite a burst of flavor. This recipe is simple to follow, making it a great choice for both beginners and seasoned bakers.
Whether you’re celebrating a special occasion or just want to enjoy a sweet dessert, this strawberry shortcake is sure to impress. It’s a classic dessert that brings a taste of summer to your table, and it can be whipped up in no time!
Ingredients
- 2 cups fresh strawberries, hulled and sliced
- 1/4 cup granulated sugar
- 2 cups all-purpose flour
- 1/4 cup granulated sugar (for the cake)
- 1 tablespoon baking powder
- 1/2 teaspoon salt
- 1/4 cup unsalted butter, cold and cubed
- 1 cup heavy cream
- 1 teaspoon vanilla extract
Instructions
- Prepare the Strawberries: In a bowl, combine sliced strawberries with 1/4 cup of sugar. Let them sit for about 30 minutes to release their juices.
- Make the Shortcake: Preheat your oven to 425°F (220°C). In a large bowl, mix flour, 1/4 cup sugar, baking powder, and salt. Cut in the cold butter until the mixture resembles coarse crumbs.
- Add Cream: Pour in the heavy cream and mix until just combined. Do not overmix.
- Shape the Dough: Turn the dough onto a floured surface and gently knead a few times. Pat it into a 1-inch thick rectangle. Cut out rounds using a biscuit cutter.
- Bake: Place the rounds on a baking sheet and bake for 12-15 minutes or until golden brown.
- Make Whipped Cream: In a bowl, whip the remaining heavy cream with vanilla extract until soft peaks form.
- Assemble: Split the shortcake rounds in half. Layer with strawberries and whipped cream. Top with more strawberries and serve immediately.
Rich Tiramisu with Espresso and Mascarpone

Tiramisu is a classic Italian dessert that brings together layers of coffee-soaked ladyfingers and creamy mascarpone cheese. The rich flavors of espresso and cocoa create a delightful balance that’s both indulgent and refreshing. This dessert is surprisingly simple to make, making it a perfect choice for gatherings or a sweet treat at home.
With its creamy texture and robust coffee flavor, tiramisu is sure to impress anyone who tries it. Plus, it can be prepared ahead of time, allowing the flavors to meld beautifully. Let’s get started on this delicious recipe!
Ingredients
- 1 cup strong brewed espresso, cooled
- 3 tablespoons coffee liqueur (optional)
- 3 large eggs, separated
- 1/2 cup granulated sugar
- 1 cup mascarpone cheese
- 1 cup heavy cream
- 24 ladyfingers
- Cocoa powder for dusting
Instructions
- Prepare the Coffee Mixture: In a shallow dish, combine the cooled espresso and coffee liqueur. Set aside.
- Make the Cream Mixture: In a large bowl, beat the egg yolks and sugar together until pale and creamy. Gently fold in the mascarpone cheese until smooth.
- Whip the Cream: In another bowl, whip the heavy cream until stiff peaks form. Carefully fold the whipped cream into the mascarpone mixture.
- Assemble the Tiramisu: Quickly dip each ladyfinger into the coffee mixture, ensuring they are soaked but not soggy. Layer half of the soaked ladyfingers in the bottom of a serving dish. Spread half of the mascarpone mixture over the ladyfingers.
- Repeat the Layers: Add another layer of soaked ladyfingers followed by the remaining mascarpone mixture.
- Chill: Cover the dish and refrigerate for at least 4 hours, or overnight for best results.
- Serve: Before serving, dust the top with cocoa powder. Enjoy your homemade tiramisu!
Classic New York Cheesecake with Berry Compote
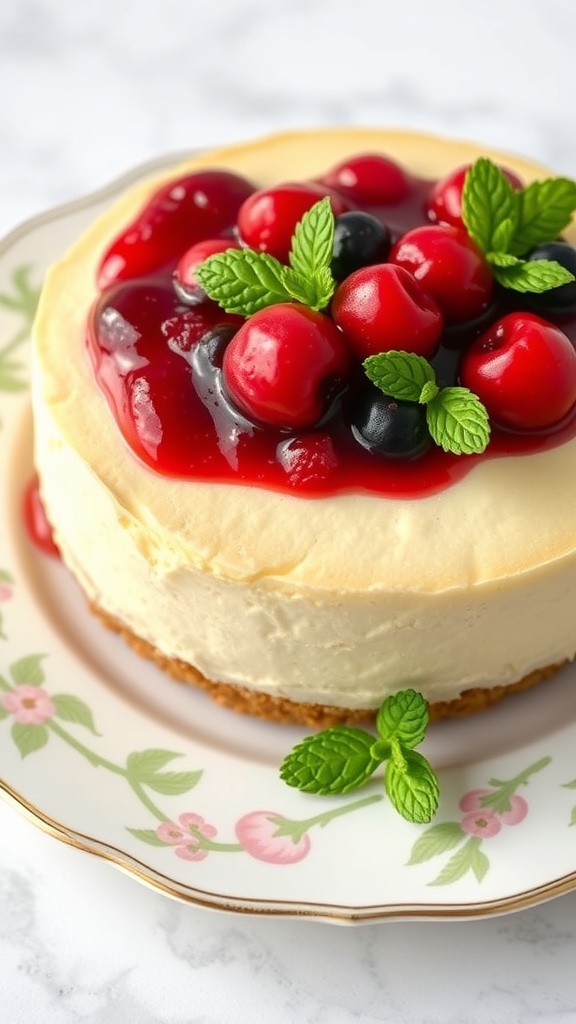
This Classic New York Cheesecake is a creamy delight that perfectly balances rich flavors with a smooth texture. Topped with a vibrant berry compote, it brings a refreshing twist that complements the cheesecake beautifully. Making this dessert is simpler than you might think, and it’s sure to impress anyone who tries it!
With a buttery graham cracker crust and a luscious filling, this cheesecake is a crowd-pleaser for any occasion. Whether it’s a family gathering or a special celebration, this dessert will be the star of the show!
Ingredients
- 1 1/2 cups graham cracker crumbs
- 1/4 cup granulated sugar
- 1/2 cup unsalted butter, melted
- 4 (8 oz) packages cream cheese, softened
- 1 cup granulated sugar
- 1 teaspoon vanilla extract
- 4 large eggs
- 1 cup sour cream
- 1/4 cup all-purpose flour
- 2 cups mixed berries (strawberries, blueberries, raspberries)
- 1/4 cup sugar (for compote)
- 1 tablespoon lemon juice
Instructions
- Preheat the oven to 325°F (160°C). In a bowl, mix graham cracker crumbs, 1/4 cup sugar, and melted butter. Press the mixture into the bottom of a 9-inch springform pan to form the crust.
- In a large mixing bowl, beat the softened cream cheese until smooth. Gradually add 1 cup sugar and vanilla extract, mixing well. Add eggs one at a time, mixing after each addition. Stir in sour cream and flour until just combined.
- Pour the cream cheese mixture over the crust in the springform pan. Bake for 55-60 minutes, or until the center is set but still slightly jiggly. Turn off the oven and let the cheesecake cool inside for 1 hour.
- Remove the cheesecake from the oven and refrigerate for at least 4 hours, or overnight for best results.
- For the berry compote, combine mixed berries, 1/4 cup sugar, and lemon juice in a saucepan. Cook over medium heat for about 10 minutes, stirring occasionally, until the berries break down and the mixture thickens slightly.
- Once the cheesecake is chilled, top it with the berry compote before serving. Enjoy your delicious Classic New York Cheesecake!
Chocolate Chip Cookie Dough Brownies
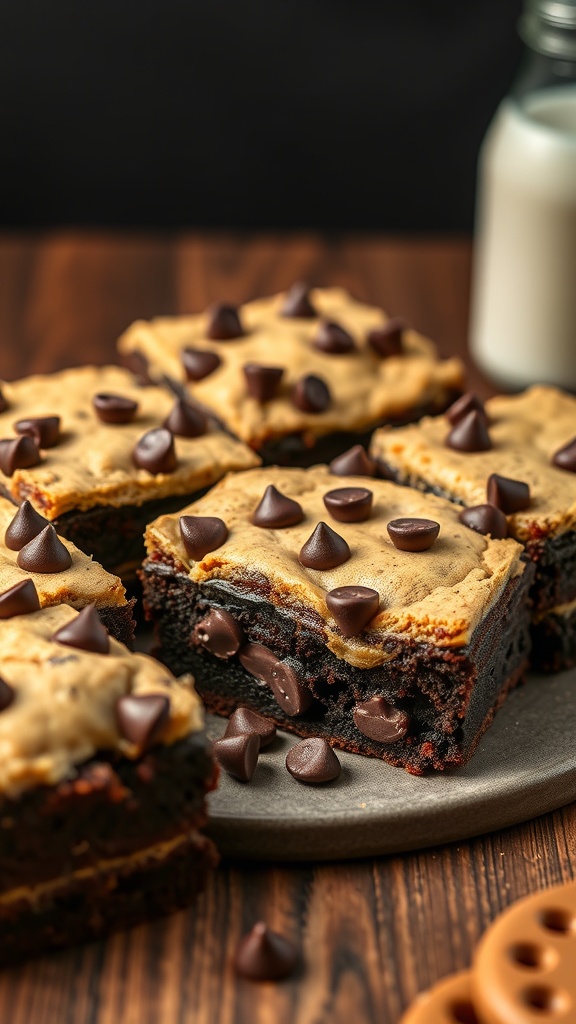
Chocolate Chip Cookie Dough Brownies are a delightful treat that combines two favorites into one delicious dessert. The rich, fudgy brownie base pairs perfectly with the sweet, cookie dough topping, creating a dessert that is both chewy and creamy. With just a few simple ingredients, this recipe is easy to whip up, making it a great choice for any occasion.
These brownies are not only a crowd-pleaser but also a fun way to satisfy your sweet tooth. Each bite offers a perfect balance of chocolate and cookie dough flavors, making them irresistible. Whether you’re baking for a party or just for yourself, these brownies are sure to impress!
Ingredients
- 1 cup unsalted butter
- 2 cups granulated sugar
- 4 large eggs
- 1 teaspoon vanilla extract
- 1 cup all-purpose flour
- 1 cup unsweetened cocoa powder
- 1/2 teaspoon salt
- 1 cup semi-sweet chocolate chips
- 1/2 cup brown sugar
- 1 cup all-purpose flour (for cookie dough)
- 1/2 cup chocolate chips (for cookie dough)
- 1/4 cup milk (for cookie dough)
- 1 teaspoon vanilla extract (for cookie dough)
Instructions
- Preheat the oven to 350°F (175°C) and grease a 9×13 inch baking pan.
- In a large bowl, melt the butter and mix in the granulated sugar until well combined. Add the eggs and vanilla, mixing until smooth.
- Stir in the flour, cocoa powder, and salt until just combined. Fold in the chocolate chips.
- Pour the brownie batter into the prepared pan and spread evenly.
- In another bowl, mix the brown sugar, flour, milk, and vanilla to make the cookie dough. Fold in the chocolate chips.
- Drop spoonfuls of the cookie dough over the brownie batter, spreading it out gently.
- Bake for 25-30 minutes, or until a toothpick inserted comes out mostly clean.
- Let cool before cutting into squares and serving.
Lemon Meringue Pie with a Buttery Crust
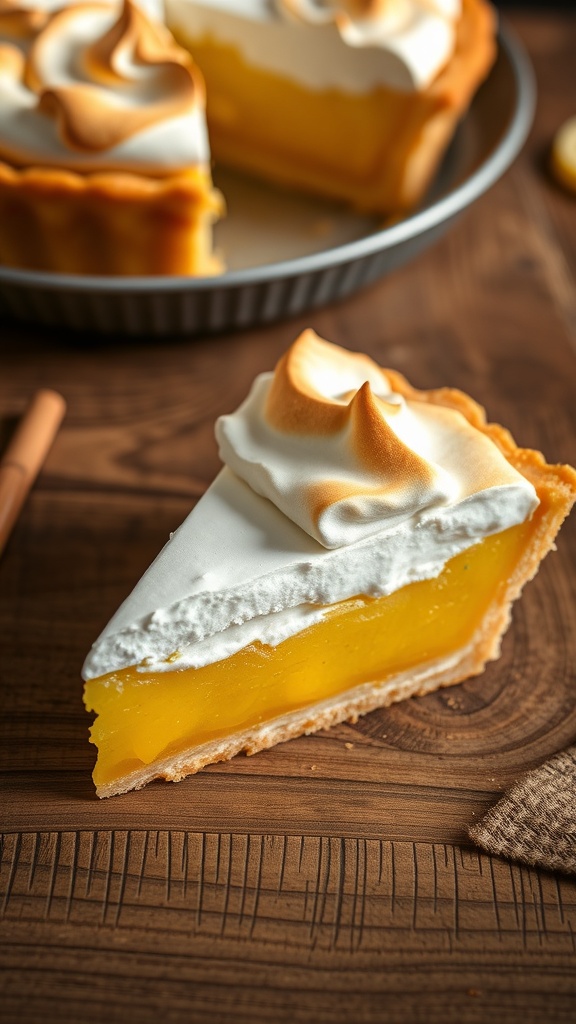
Lemon Meringue Pie is a delightful dessert that perfectly balances tartness and sweetness. The bright lemon filling is encased in a buttery, flaky crust and topped with a cloud of fluffy meringue. This pie is not only delicious but also simple to make, making it a great choice for both novice and experienced bakers.
Each bite offers a refreshing zing from the lemons, complemented by the creamy texture of the filling and the lightness of the meringue. Whether you’re serving it at a family gathering or enjoying a slice on a quiet afternoon, this pie is sure to impress!
Ingredients
- 1 1/4 cups all-purpose flour
- 1/2 cup unsalted butter, chilled and diced
- 1/4 cup granulated sugar
- 1/4 teaspoon salt
- 1/4 cup ice water
- 1 cup granulated sugar (for filling)
- 1/4 cup cornstarch
- 1/4 teaspoon salt (for filling)
- 1 1/2 cups water
- 3 large egg yolks, beaten
- 1/2 cup fresh lemon juice
- 1 tablespoon lemon zest
- 2 tablespoons unsalted butter (for filling)
- 3 large egg whites
- 1/4 teaspoon cream of tartar
- 1/2 cup granulated sugar (for meringue)
Instructions
- Make the Crust: Preheat your oven to 425°F (220°C). In a bowl, mix flour, sugar, and salt. Cut in butter until the mixture resembles coarse crumbs. Stir in ice water until the dough forms. Roll out and fit into a pie pan. Prick the bottom with a fork and bake for 12-15 minutes until golden. Let cool.
- Prepare the Filling: In a saucepan, mix sugar, cornstarch, and salt. Gradually stir in water. Cook over medium heat, stirring constantly until thickened. Stir a small amount of the hot mixture into the egg yolks, then return to the saucepan. Cook for 2 more minutes. Remove from heat and stir in lemon juice, zest, and butter.
- Make the Meringue: In a clean bowl, beat egg whites and cream of tartar until soft peaks form. Gradually add sugar, beating until stiff peaks form.
- Assemble the Pie: Pour the lemon filling into the cooled crust. Spread the meringue over the filling, sealing the edges. Bake at 350°F (175°C) for 10-15 minutes until the meringue is golden.
- Cool and Serve: Allow the pie to cool completely before slicing. Enjoy your homemade Lemon Meringue Pie!
Molten Nutella Mug Cake

This molten Nutella mug cake is a quick and delightful treat that satisfies your chocolate cravings in just a few minutes. With a gooey center of rich Nutella, each spoonful is a warm hug for your taste buds. It’s super simple to whip up, making it perfect for those late-night dessert urges or when you want to impress guests with minimal effort.
The cake is soft, fluffy, and has a wonderful chocolate flavor that pairs perfectly with a sprinkle of powdered sugar on top. You can enjoy it straight from the mug, which makes cleanup a breeze!
Ingredients
- 4 tablespoons all-purpose flour
- 4 tablespoons granulated sugar
- 2 tablespoons unsweetened cocoa powder
- 1/8 teaspoon baking powder
- 1/8 teaspoon salt
- 3 tablespoons milk
- 2 tablespoons vegetable oil
- 2 tablespoons Nutella
- 1/4 teaspoon vanilla extract
Instructions
- In a microwave-safe mug, mix together the flour, sugar, cocoa powder, baking powder, and salt until well combined.
- Add the milk, vegetable oil, Nutella, and vanilla extract to the dry ingredients. Stir until smooth and fully combined.
- Microwave the mug on high for about 40-60 seconds, or until the cake has risen and is set but still slightly gooey in the center.
- Let it cool for a minute, then sprinkle with powdered sugar before digging in. Enjoy your delicious treat!
Banana Pudding with Vanilla Wafers
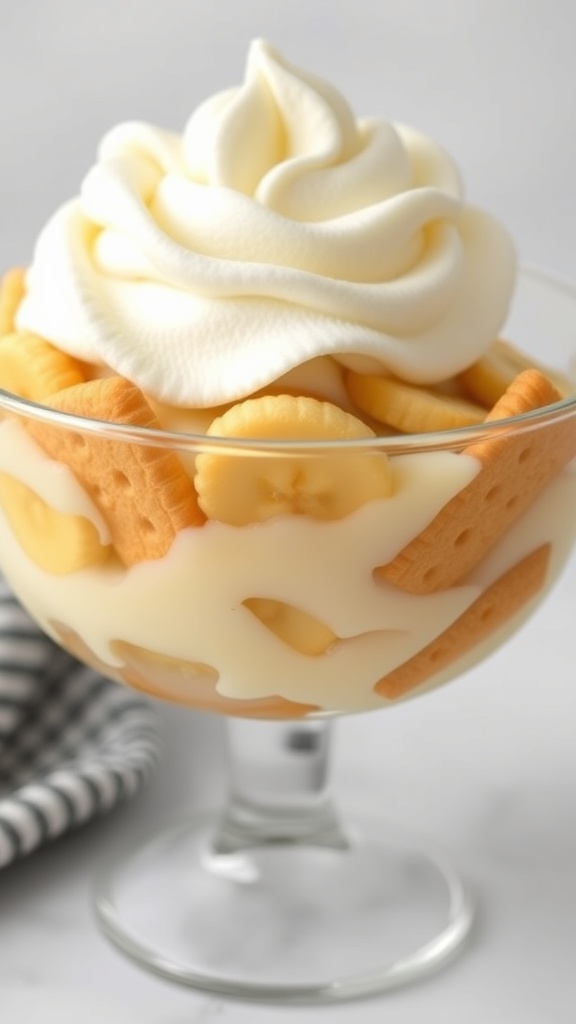
Banana pudding with vanilla wafers is a classic dessert that brings a smile to anyone’s face. This sweet treat combines creamy vanilla pudding, fresh bananas, and crunchy vanilla wafers for a delightful texture and flavor. It’s a simple recipe that requires minimal effort, making it perfect for any occasion.
The taste is a wonderful blend of sweetness and creaminess, with the bananas adding a natural flavor that pairs beautifully with the vanilla. Whether you’re serving it at a family gathering or just enjoying a quiet evening at home, this dessert is sure to please.
Ingredients
- 2 cups milk
- 1/2 cup granulated sugar
- 1/3 cup cornstarch
- 1/4 teaspoon salt
- 2 teaspoons vanilla extract
- 3 ripe bananas, sliced
- 1 box vanilla wafers
- Whipped cream for topping
Instructions
- In a medium saucepan, combine milk, sugar, cornstarch, and salt. Cook over medium heat, stirring constantly until the mixture thickens and begins to bubble.
- Remove from heat and stir in vanilla extract. Allow the pudding to cool slightly.
- In a serving dish, layer vanilla wafers, sliced bananas, and pudding. Repeat layers until all ingredients are used, finishing with pudding on top.
- Chill in the refrigerator for at least 2 hours before serving. Top with whipped cream just before serving.
Chocolate Raspberry Tart with Almond Crust

This Chocolate Raspberry Tart with Almond Crust is a delightful treat that combines rich chocolate with the tartness of fresh raspberries. The almond crust adds a nutty flavor that perfectly complements the smooth chocolate filling. It’s a simple recipe that anyone can whip up, making it a great choice for both beginners and experienced bakers.
With its stunning presentation and delicious taste, this tart is perfect for any occasion. Whether you’re celebrating a special event or just treating yourself, this dessert is sure to impress. Plus, it comes together quickly, so you won’t spend all day in the kitchen!
Ingredients
- 1 1/2 cups almond flour
- 1/4 cup granulated sugar
- 1/4 cup unsalted butter, melted
- 1 large egg
- 1/2 teaspoon vanilla extract
- 1 cup dark chocolate chips
- 1/2 cup heavy cream
- 1 cup fresh raspberries
- 1 tablespoon sliced almonds (for garnish)
Instructions
- Preheat the oven to 350°F (175°C). In a bowl, mix almond flour, sugar, melted butter, egg, and vanilla extract until combined.
- Press the mixture into a tart pan evenly across the bottom and up the sides. Bake for 10-12 minutes until lightly golden. Let it cool.
- In a saucepan, heat the heavy cream until just simmering. Remove from heat and add chocolate chips, stirring until smooth.
- Pour the chocolate mixture into the cooled tart shell. Refrigerate for about 1 hour until set.
- Once set, top with fresh raspberries and sprinkle sliced almonds over the tart before serving.
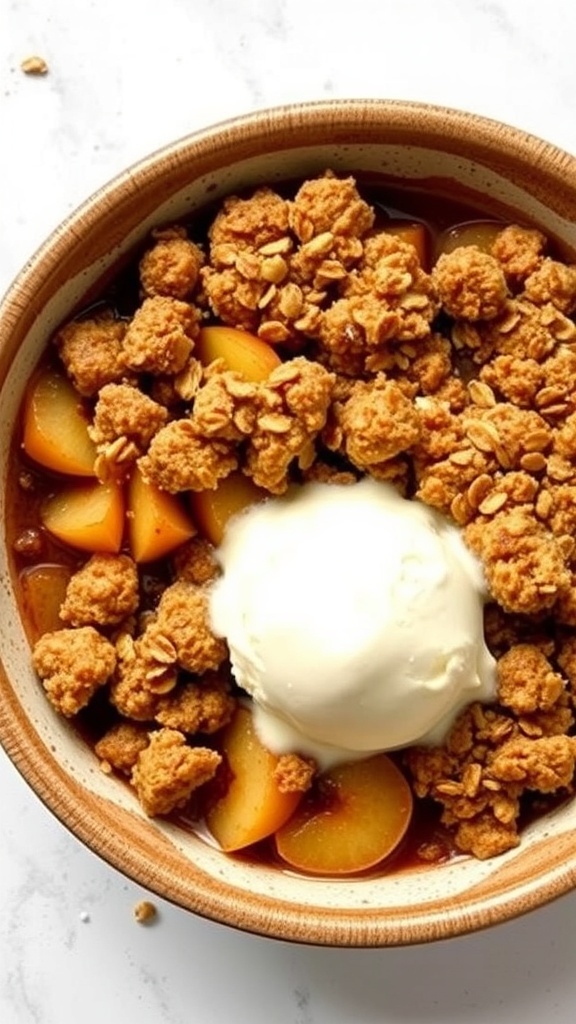
Caramel Apple Crisp with Oat Topping
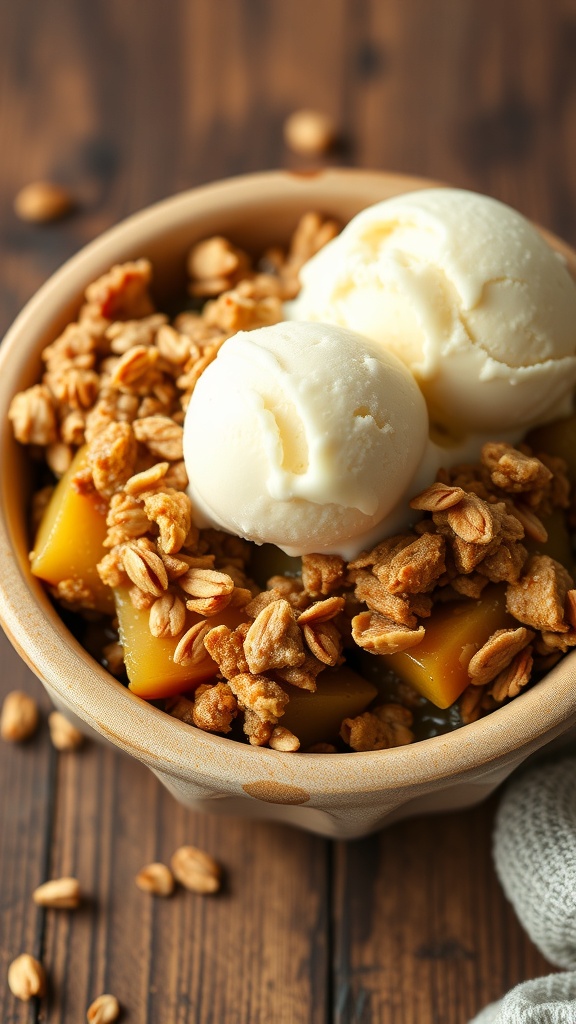
Caramel Apple Crisp with Oat Topping is a warm and comforting dessert that perfectly combines sweet and tart flavors. The tender apples are enveloped in a rich caramel sauce, while the oat topping adds a delightful crunch. This recipe is simple to make and is sure to impress your family and friends.
With just a few ingredients and minimal prep time, you can whip up this delicious treat in no time. Serve it warm with a scoop of vanilla ice cream for an extra special touch!
Ingredients
- 4 cups sliced apples (about 4 medium apples)
- 1 cup granulated sugar
- 1/2 cup unsalted butter, melted
- 1 cup rolled oats
- 1 cup all-purpose flour
- 1 teaspoon ground cinnamon
- 1/2 teaspoon salt
- 1/2 cup packed brown sugar
- 1/4 cup caramel sauce (plus more for drizzling)
Instructions
- Preheat your oven to 350°F (175°C). Grease a baking dish.
- In a large bowl, toss the sliced apples with granulated sugar and caramel sauce. Spread the apple mixture evenly in the prepared baking dish.
- In another bowl, combine the melted butter, oats, flour, cinnamon, salt, and brown sugar. Mix until crumbly.
- Sprinkle the oat mixture over the apples in the baking dish.
- Bake for 30-35 minutes, or until the topping is golden brown and the apples are tender.
- Let it cool slightly before serving. Drizzle with extra caramel sauce and enjoy!
S’mores Dip with Graham Crackers
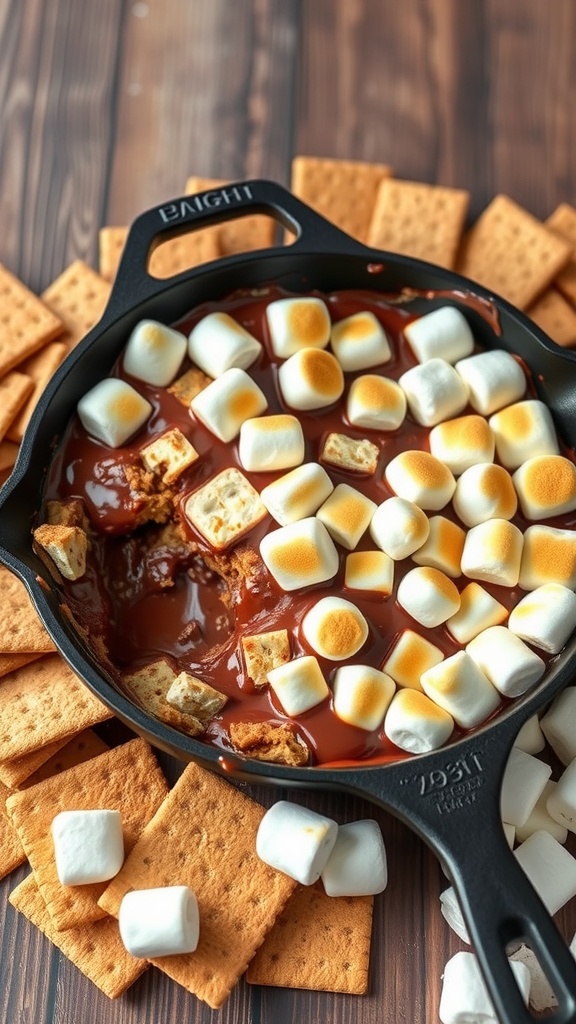
S’mores Dip is a fun twist on the classic campfire treat. It combines gooey chocolate and toasted marshmallows, all served warm and melty. This dessert is perfect for gatherings, movie nights, or just a cozy evening at home.
The taste is a delightful mix of sweet chocolate and fluffy marshmallows, paired with crunchy graham crackers for dipping. Plus, it’s super simple to make, requiring just a few ingredients and minimal prep time!
Ingredients
- 1 cup chocolate chips
- 1 cup mini marshmallows
- 1/2 cup graham cracker pieces
- 1 tablespoon unsalted butter
Instructions
- Preheat your oven to 450°F (230°C).
- In a cast-iron skillet, melt the butter over medium heat. Add the chocolate chips and stir until melted and smooth.
- Remove from heat and sprinkle mini marshmallows evenly over the melted chocolate.
- Bake in the oven for about 5 minutes, or until the marshmallows are golden brown.
- Serve warm with graham cracker pieces for dipping.
Matcha Green Tea Cheesecake
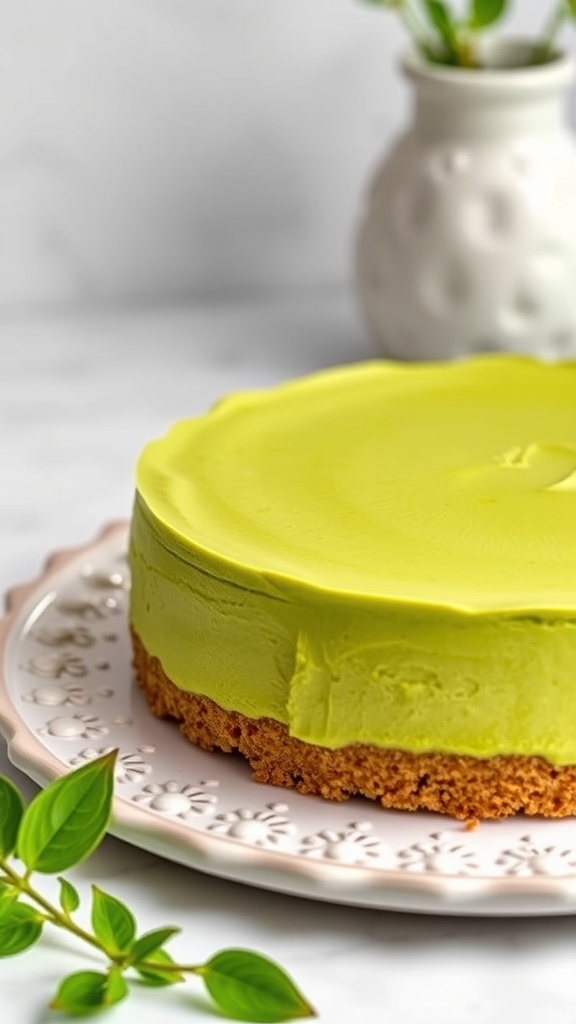
Matcha Green Tea Cheesecake is a delightful twist on the classic dessert. The creamy texture combined with the earthy flavor of matcha creates a unique taste that is both refreshing and satisfying. This cheesecake is not overly sweet, making it a perfect treat for those who enjoy a more subtle dessert.
Making this cheesecake is quite simple, even for beginners. With just a few ingredients and straightforward steps, you can whip up this stunning dessert that will impress your friends and family.
Ingredients
- 1 ½ cups graham cracker crumbs
- ½ cup unsalted butter, melted
- 2 cups cream cheese, softened
- 1 cup granulated sugar
- 2 teaspoons matcha green tea powder
- 1 teaspoon vanilla extract
- 3 large eggs
- 1 cup sour cream
- ¼ cup heavy cream
Instructions
- Preheat the oven to 325°F (160°C). Grease a 9-inch springform pan.
- In a bowl, mix graham cracker crumbs and melted butter until combined. Press the mixture into the bottom of the prepared pan to form the crust.
- In a large mixing bowl, beat the cream cheese and sugar until smooth. Add matcha powder and vanilla extract, mixing until well combined.
- Add the eggs one at a time, mixing well after each addition. Then, stir in the sour cream and heavy cream until smooth.
- Pour the cheesecake batter over the crust in the springform pan. Bake for 50-60 minutes, or until the center is set but slightly jiggly.
- Turn off the oven and let the cheesecake cool in the oven with the door slightly ajar for about an hour. Then, refrigerate for at least 4 hours or overnight before serving.
- Slice and enjoy your Matcha Green Tea Cheesecake!
Orange Almond Biscotti with Chocolate Dip
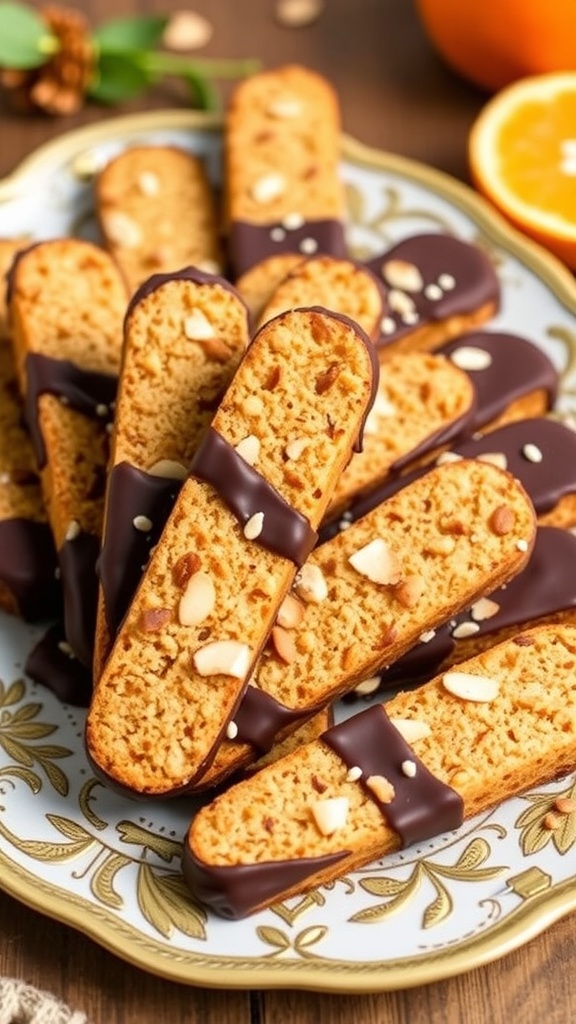
Orange Almond Biscotti with Chocolate Dip is a delightful treat that combines the bright flavor of oranges with the nutty crunch of almonds. This recipe is simple to make, perfect for both novice bakers and seasoned pros. The chocolate dip adds a rich finish, making these biscotti a wonderful snack or dessert.
These biscotti are not overly sweet, allowing the citrus and nut flavors to shine through. They are great for dipping in coffee or tea, making them a lovely addition to your afternoon break or a special gathering.
Ingredients
- 2 cups all-purpose flour
- 1 cup granulated sugar
- 1 teaspoon baking powder
- 1/2 teaspoon salt
- 1/2 cup unsalted butter, softened
- 3 large eggs
- 1 teaspoon vanilla extract
- 1 tablespoon orange zest
- 1 cup sliced almonds
- 1 cup semi-sweet chocolate chips
Instructions
- Preheat the oven to 350°F (175°C). Line a baking sheet with parchment paper.
- In a large bowl, mix together flour, sugar, baking powder, and salt. In another bowl, beat the butter and eggs until smooth. Add vanilla extract and orange zest, mixing well.
- Gradually combine the wet and dry ingredients, then fold in the sliced almonds.
- Divide the dough in half and shape each half into a log about 12 inches long. Place the logs on the prepared baking sheet.
- Bake for 25-30 minutes, or until golden brown. Remove from the oven and let cool for 10 minutes.
- Slice the logs diagonally into 1-inch thick pieces. Place the slices back on the baking sheet, cut side down, and bake for an additional 10-15 minutes until crisp.
- While the biscotti cool, melt the chocolate chips in a microwave or double boiler. Dip half of each biscotti into the melted chocolate and place on wax paper to set.
Coconut Cream Pie with Toasted Meringue
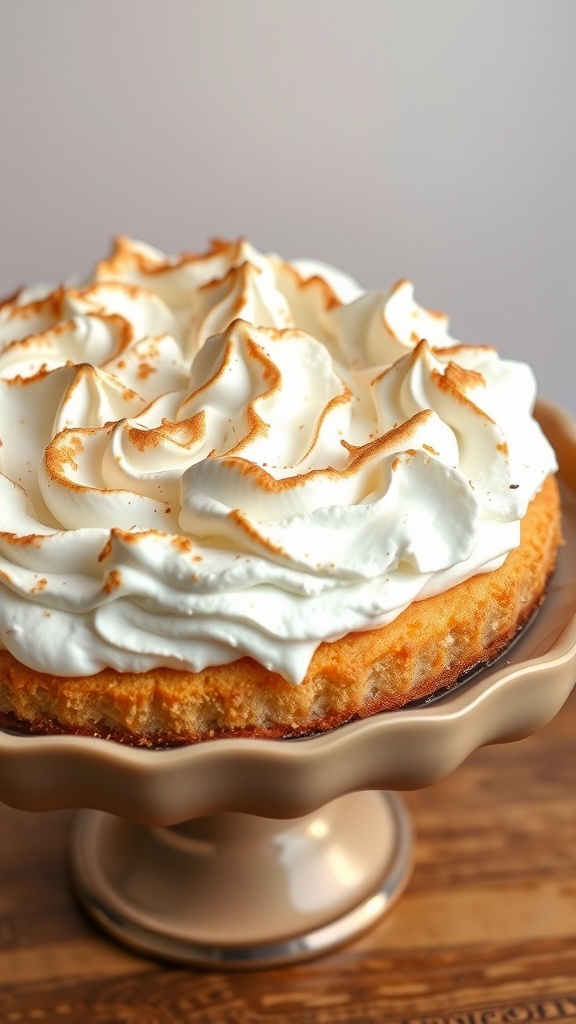
Coconut cream pie is a delightful dessert that brings a tropical twist to your table. With a creamy coconut filling and a light, fluffy meringue topping, it’s a treat that’s both refreshing and satisfying. The combination of sweet coconut and the airy meringue creates a perfect balance of flavors and textures.
This recipe is simple enough for bakers of all levels. You’ll love how easy it is to whip up this pie, making it a great choice for gatherings or just a special treat at home.
Ingredients
- 1 pre-baked pie crust
- 1 cup coconut milk
- 1 cup whole milk
- 3/4 cup granulated sugar
- 1/4 cup cornstarch
- 1/4 teaspoon salt
- 3 large egg yolks
- 1 teaspoon vanilla extract
- 1 cup shredded coconut (sweetened or unsweetened)
- 1 tablespoon unsalted butter
- 3 large egg whites
- 1/4 teaspoon cream of tartar
- 1/2 cup granulated sugar (for meringue)
Instructions
- Make the Filling: In a saucepan, combine coconut milk, whole milk, sugar, cornstarch, and salt. Cook over medium heat, stirring constantly until thickened. Remove from heat.
- Mix in Egg Yolks: In a separate bowl, whisk the egg yolks. Gradually add a small amount of the hot mixture to the yolks, then return this mixture to the saucepan. Stir in vanilla extract and shredded coconut. Add butter and mix until melted and combined.
- Fill the Crust: Pour the coconut filling into the pre-baked pie crust and smooth the top. Let it cool to room temperature, then refrigerate for at least 2 hours.
- Prepare the Meringue: In a clean bowl, beat egg whites with cream of tartar until soft peaks form. Gradually add sugar, continuing to beat until stiff peaks form.
- Top the Pie: Spread the meringue over the cooled coconut filling, making sure to seal the edges. Use a spatula to create peaks and swirls.
- Toast the Meringue: Preheat the oven to 350°F (175°C). Bake the pie for about 10 minutes, or until the meringue is golden brown. Keep an eye on it to prevent burning.
- Cool and Serve: Allow the pie to cool before slicing. Enjoy your delicious coconut cream pie!
Lime Coconut Sorbet with Fresh Lime Zest
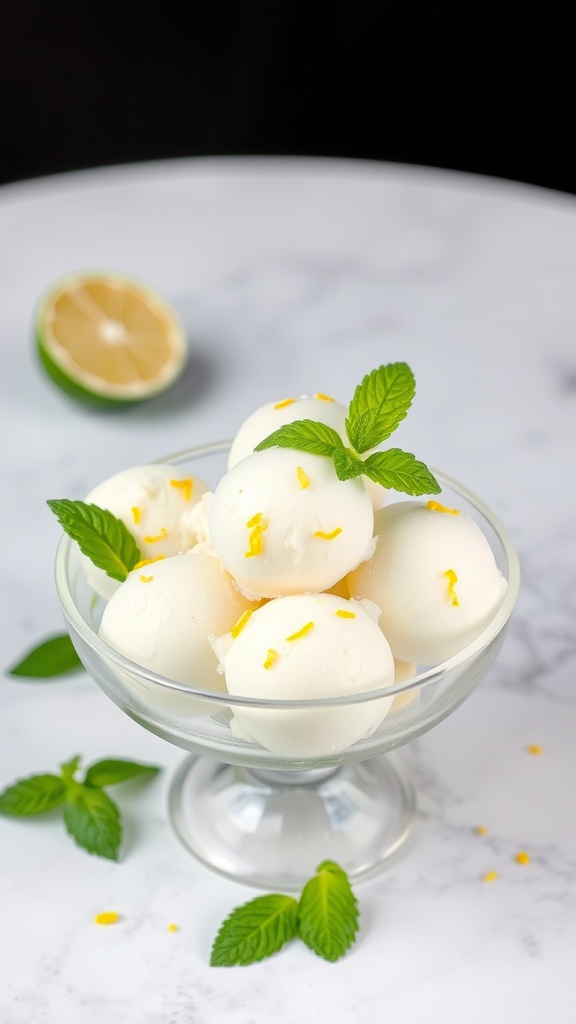
Looking for a refreshing treat? Lime Coconut Sorbet is a perfect choice! This sorbet combines the bright, tangy flavor of lime with the creamy sweetness of coconut, making it a delightful dessert for warm days.
It’s super easy to whip up, requiring just a few simple ingredients. You’ll love how the fresh lime zest adds an extra zing, elevating this sorbet to a whole new level of deliciousness.
Ingredients
- 2 cups coconut milk
- 1 cup fresh lime juice
- 1 cup granulated sugar
- 1 tablespoon lime zest
- 1/4 teaspoon salt
Instructions
- In a mixing bowl, whisk together the coconut milk, fresh lime juice, sugar, lime zest, and salt until the sugar is fully dissolved.
- Pour the mixture into an ice cream maker and churn according to the manufacturer’s instructions until it reaches a soft-serve consistency.
- Transfer the sorbet to an airtight container and freeze for at least 4 hours or until firm.
- When ready to serve, scoop the sorbet into bowls and garnish with additional lime zest or mint leaves if desired.
Pumpkin Spice Latte Cupcakes
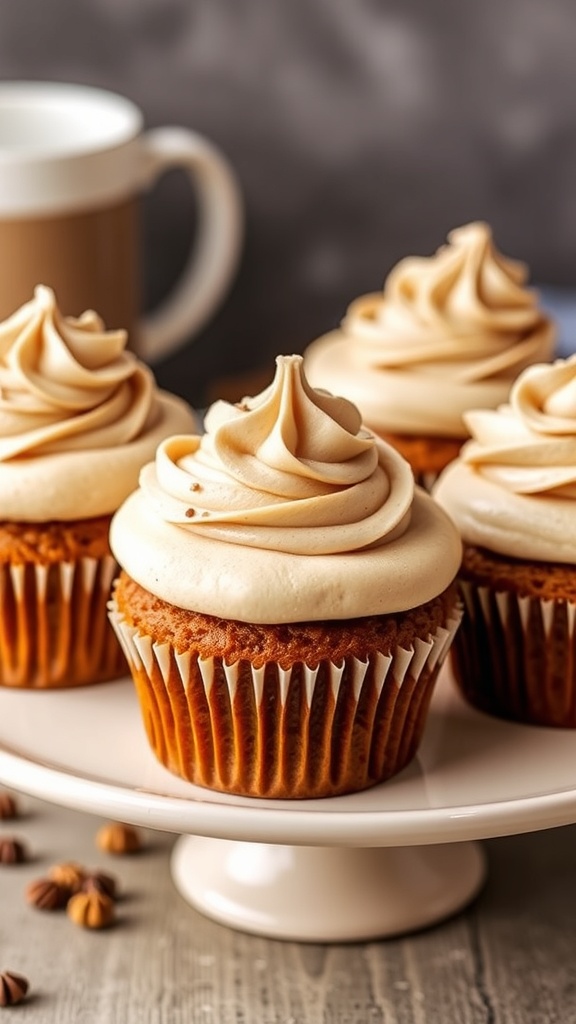
These Pumpkin Spice Latte Cupcakes are a delightful treat that combines the flavors of fall with the beloved coffeehouse favorite. With a moist pumpkin base and rich coffee-infused frosting, they offer a perfect blend of sweetness and spice. Plus, they’re simple to whip up, making them a great option for any occasion.
Each bite is like a warm hug, with the comforting taste of pumpkin and a hint of espresso. Whether you’re hosting a gathering or just treating yourself, these cupcakes are sure to impress!
Ingredients
- 1 1/2 cups all-purpose flour
- 1 teaspoon baking powder
- 1/2 teaspoon baking soda
- 1/2 teaspoon salt
- 1 teaspoon ground cinnamon
- 1/2 teaspoon ground nutmeg
- 1/4 teaspoon ground ginger
- 1/2 cup unsalted butter, softened
- 1 cup granulated sugar
- 2 large eggs
- 1 cup canned pumpkin puree
- 1/4 cup brewed coffee, cooled
- 1 teaspoon vanilla extract
Instructions
- Preheat the oven to 350°F (175°C) and line a cupcake pan with liners.
- In a bowl, whisk together flour, baking powder, baking soda, salt, cinnamon, nutmeg, and ginger.
- In another bowl, beat the softened butter and sugar until light and fluffy. Add eggs one at a time, mixing well after each addition.
- Stir in pumpkin puree, coffee, and vanilla extract until combined.
- Gradually add the dry ingredients to the wet mixture, mixing until just combined.
- Divide the batter evenly among the cupcake liners, filling each about two-thirds full.
- Bake for 18-20 minutes, or until a toothpick inserted in the center comes out clean. Let cool completely.
- For the frosting, beat together 1/2 cup softened butter, 2 cups powdered sugar, 2 tablespoons brewed coffee, and 1 teaspoon vanilla extract until smooth and creamy. Frost the cooled cupcakes as desired.
Peach Melba with Vanilla Ice Cream
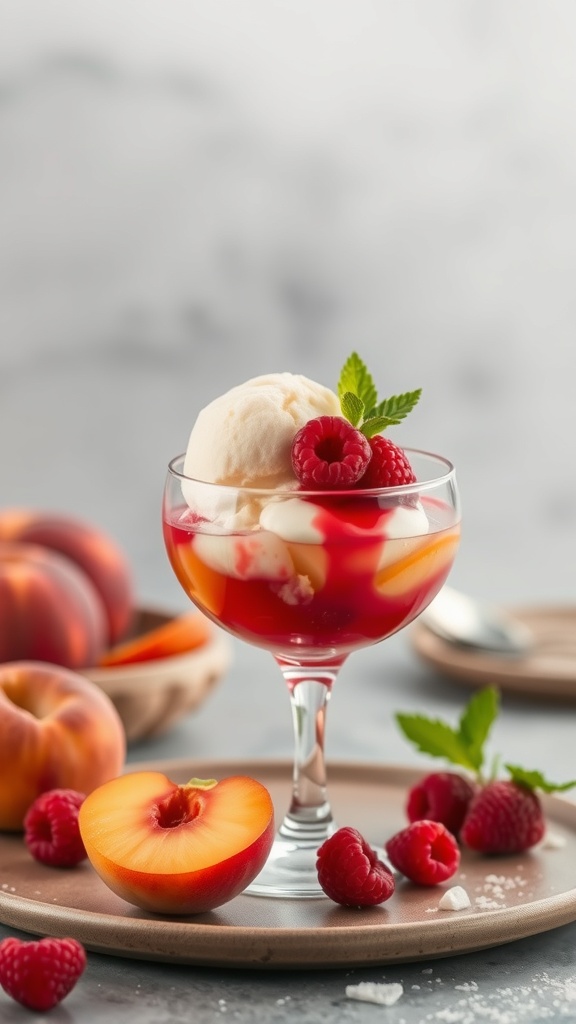
Peach Melba is a delightful dessert that combines juicy peaches, raspberry sauce, and creamy vanilla ice cream. This classic treat is not only refreshing but also incredibly easy to make, making it perfect for any occasion. The sweet and tangy flavors blend beautifully, creating a dessert that’s sure to impress.
With just a few simple ingredients, you can whip up this elegant dish in no time. It’s a fantastic way to enjoy summer fruits and is sure to satisfy your sweet tooth!
Ingredients
- 4 ripe peaches, peeled and sliced
- 1 cup fresh raspberries
- 1/2 cup granulated sugar
- 1 tablespoon lemon juice
- 2 cups vanilla ice cream
- Fresh mint leaves for garnish
Instructions
- Make the Raspberry Sauce: In a small saucepan, combine raspberries, sugar, and lemon juice. Cook over medium heat for about 5 minutes until the raspberries break down and the mixture thickens slightly. Remove from heat and let it cool.
- Prepare the Peaches: While the sauce is cooling, slice the peaches and arrange them in serving bowls.
- Assemble the Dessert: Scoop vanilla ice cream on top of the sliced peaches. Drizzle the raspberry sauce over the ice cream.
- Garnish: Add a few fresh raspberries and mint leaves on top for a pop of color and flavor.
- Serve immediately and enjoy your Peach Melba!
Chocolate Hazelnut Pavlova
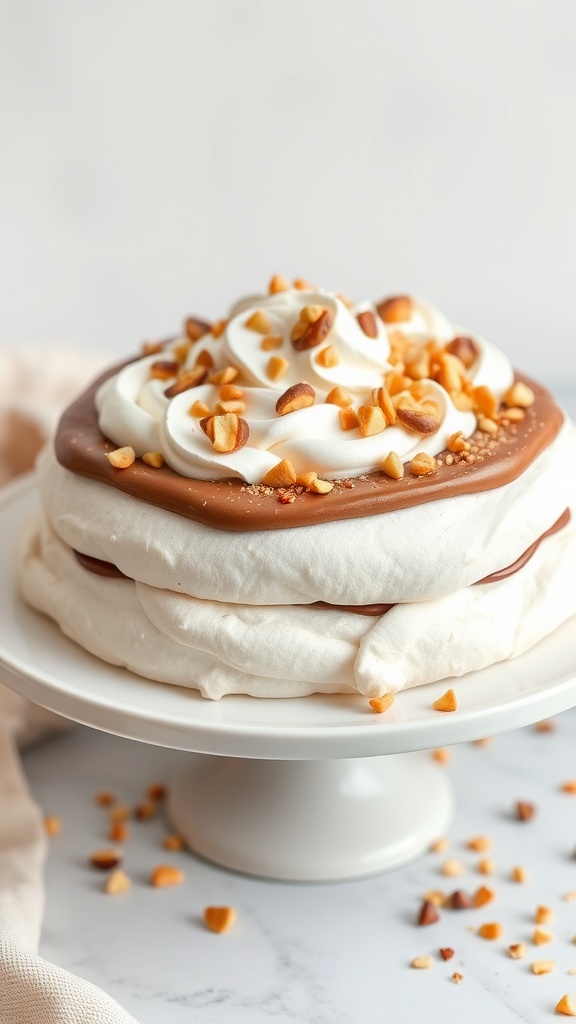
This Chocolate Hazelnut Pavlova is a delightful dessert that combines a crispy meringue shell with a soft, marshmallow-like interior. Topped with rich chocolate ganache and whipped cream, it offers a perfect balance of sweetness and texture. It’s surprisingly simple to make, making it a great choice for both novice and experienced bakers.
The pavlova is light and airy, with a hint of nuttiness from the hazelnuts. Each bite melts in your mouth, leaving you craving more. Whether for a special occasion or just a treat for yourself, this dessert is sure to impress!
Ingredients
- 4 large egg whites
- 1 cup granulated sugar
- 1 teaspoon vanilla extract
- 1 teaspoon cornstarch
- 1 tablespoon white vinegar
- 1 cup heavy cream
- 1/2 cup chocolate hazelnut spread
- 1/4 cup chopped hazelnuts
Instructions
- Preheat the oven to 250°F (120°C) and line a baking sheet with parchment paper.
- In a clean bowl, beat the egg whites until soft peaks form. Gradually add the sugar, continuing to beat until stiff peaks form and the mixture is glossy.
- Gently fold in the vanilla, cornstarch, and vinegar until just combined.
- Spoon the meringue onto the prepared baking sheet, shaping it into a circle with a slight well in the center.
- Bake for 1 hour, then turn off the oven and let the pavlova cool completely inside.
- Once cooled, whip the heavy cream until soft peaks form. Spread the chocolate hazelnut spread over the pavlova, then top with whipped cream.
- Sprinkle with chopped hazelnuts before serving. Enjoy!
Raspberry Almond Crumble Bars
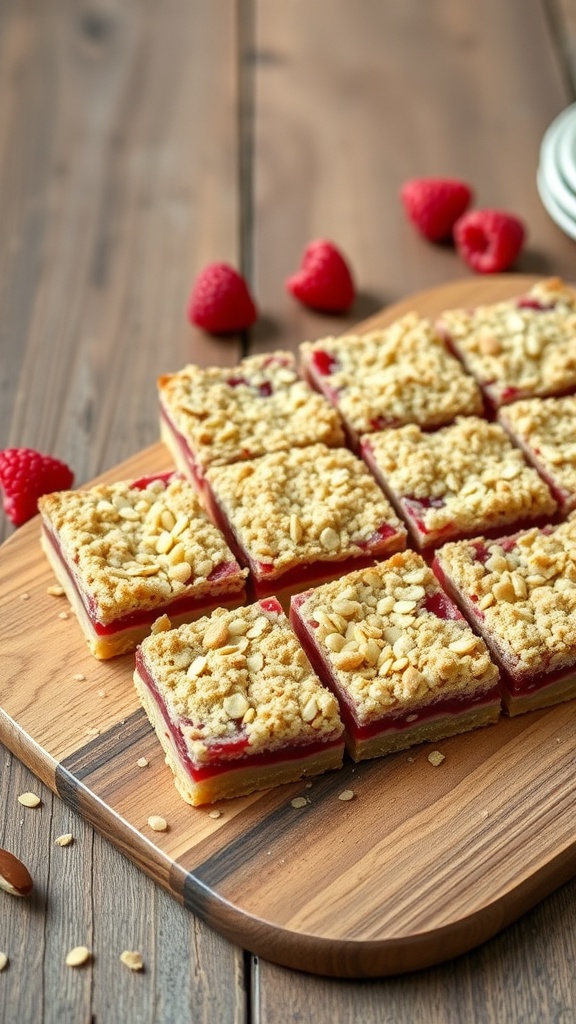
Raspberry Almond Crumble Bars are a delightful treat that perfectly balances sweet and tart flavors. The juicy raspberry filling is complemented by a buttery almond crumble topping, making each bite a burst of deliciousness. Plus, this recipe is simple enough for anyone to whip up, whether you’re a baking novice or a seasoned pro.
These bars are not only tasty but also visually appealing, making them a great addition to any dessert table. With just a few ingredients and minimal effort, you can enjoy a homemade dessert that’s sure to impress family and friends.
Ingredients
- 1 cup all-purpose flour
- 1/2 cup rolled oats
- 1/2 cup brown sugar
- 1/4 cup granulated sugar
- 1/2 cup unsalted butter, softened
- 1/2 teaspoon almond extract
- 1 cup raspberry jam
- 1/4 cup sliced almonds
Instructions
- Preheat the oven to 350°F (175°C) and grease an 8×8-inch baking dish.
- In a bowl, mix flour, oats, brown sugar, and granulated sugar. Add softened butter and almond extract, mixing until crumbly.
- Press half of the mixture into the bottom of the prepared baking dish to form the base.
- Spread the raspberry jam evenly over the crust.
- Sprinkle the remaining crumble mixture over the jam, then top with sliced almonds.
- Bake for 25-30 minutes or until the top is golden brown. Allow to cool before cutting into squares.
Apple Cinnamon Roll Casserole
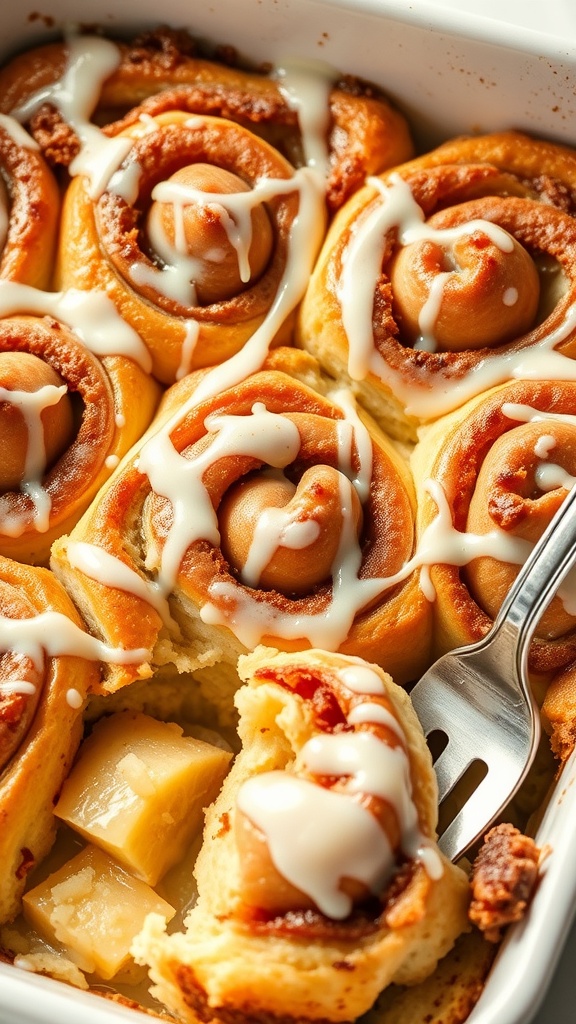
This Apple Cinnamon Roll Casserole is a delightful twist on a classic breakfast favorite. It combines soft, gooey cinnamon rolls with sweet, tender apples, creating a warm and comforting dish that’s perfect for any occasion.
The flavors of cinnamon and apple blend beautifully, making each bite a treat. Plus, it’s super easy to whip up, so you can enjoy a delicious dessert without spending hours in the kitchen!
Ingredients
- 2 cans (12.4 oz each) refrigerated cinnamon rolls
- 2 cups diced apples (about 2 medium apples)
- 1/2 cup brown sugar
- 1 teaspoon ground cinnamon
- 1/4 cup chopped pecans (optional)
- 1/4 cup unsalted butter, melted
- 1/2 cup maple syrup
- 1/4 cup powdered sugar (for drizzling)
Instructions
- Preheat the oven to 350°F (175°C) and grease a 9×13-inch baking dish.
- Cut each cinnamon roll into quarters and place them in the prepared dish.
- In a bowl, mix the diced apples, brown sugar, and cinnamon. Pour this mixture over the cinnamon rolls, ensuring even distribution.
- Sprinkle the chopped pecans over the top if using, then drizzle the melted butter and maple syrup over everything.
- Bake for 25-30 minutes, or until the rolls are golden brown and cooked through.
- Let cool slightly, then drizzle with powdered sugar before serving.
Chocolate Mint Oreo Truffles

Chocolate Mint Oreo Truffles are a delightful treat that combines the rich flavors of chocolate and mint with the crunch of Oreos. These truffles are creamy, sweet, and have a refreshing minty kick that makes them perfect for any occasion. Plus, they’re super easy to whip up, making them a great choice for both novice and experienced bakers.
Each bite is a burst of flavor, with a smooth chocolate coating that contrasts beautifully with the crunchy Oreo filling. Whether you’re serving them at a party or enjoying them as a late-night snack, these truffles are sure to impress!
Ingredients
- 1 package (15.25 oz) Oreo cookies
- 8 oz cream cheese, softened
- 1 cup semi-sweet chocolate chips
- 1/2 teaspoon peppermint extract
- 1 cup white chocolate chips
- Green food coloring (optional)
- Crushed peppermint candies for garnish (optional)
Instructions
- Crush the Oreos: In a food processor, pulse the Oreo cookies until they are finely crushed. Transfer to a mixing bowl.
- Mix the Filling: Add the softened cream cheese and peppermint extract to the crushed Oreos. Mix until well combined and smooth.
- Form the Truffles: Using your hands, roll the mixture into small balls, about 1 inch in diameter. Place them on a baking sheet lined with parchment paper.
- Chill: Refrigerate the truffles for about 30 minutes, or until firm.
- Melt the Chocolate: In a microwave-safe bowl, melt the semi-sweet chocolate chips in 30-second intervals, stirring in between until smooth.
- Coat the Truffles: Dip each chilled truffle into the melted chocolate, allowing any excess to drip off. Return to the baking sheet.
- Decorate: Melt the white chocolate chips and add a few drops of green food coloring if desired. Drizzle over the coated truffles and sprinkle with crushed peppermint candies.
- Set and Serve: Let the truffles set at room temperature or refrigerate until the chocolate is firm. Enjoy your delicious Chocolate Mint Oreo Truffles!
Cinnamon Sugar Churros with Chocolate Sauce
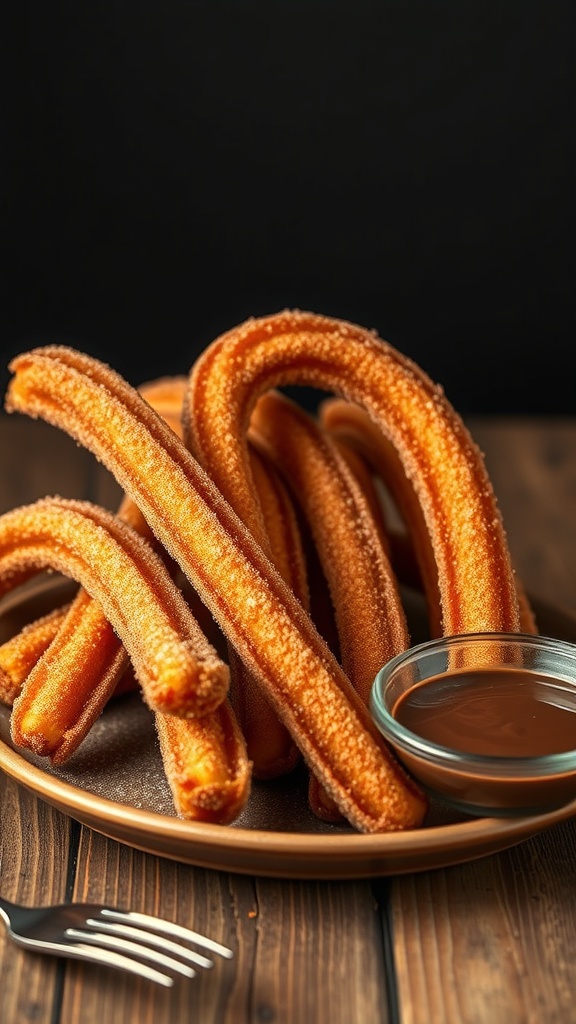
Cinnamon sugar churros are a delightful treat that combines a crispy exterior with a soft, warm inside. These sweet, golden sticks are coated in cinnamon sugar and served with a rich chocolate sauce for dipping. They are easy to make and perfect for any occasion, whether it’s a cozy night in or a festive gathering with friends.
The churros have a wonderful balance of sweetness and spice, making them irresistible. Plus, the process is simple enough for anyone to try, even if you’re new to baking. Get ready to impress your family and friends with this delicious dessert!
Ingredients
- 1 cup water
- 1/2 cup unsalted butter
- 1 tablespoon granulated sugar
- 1/4 teaspoon salt
- 1 cup all-purpose flour
- 2 large eggs
- 1 teaspoon vanilla extract
- 1/2 cup granulated sugar (for coating)
- 1 tablespoon ground cinnamon
- Vegetable oil (for frying)
- 1 cup semi-sweet chocolate chips
- 1/2 cup heavy cream
Instructions
- Make the Dough: In a saucepan, combine water, butter, sugar, and salt. Bring to a boil, then remove from heat. Stir in flour until the mixture forms a ball. Let it cool slightly, then add eggs and vanilla, mixing until smooth.
- Prepare the Oil: Heat vegetable oil in a deep fryer or large pot to 375°F (190°C).
- Pipe the Churros: Transfer the dough to a piping bag fitted with a star tip. Pipe strips of dough into the hot oil, cutting them to your desired length. Fry until golden brown, about 2-3 minutes per side. Remove and drain on paper towels.
- Coat with Cinnamon Sugar: In a bowl, mix granulated sugar and cinnamon. Roll the warm churros in the mixture until fully coated.
- Make the Chocolate Sauce: In a small saucepan, heat heavy cream until just simmering. Remove from heat and stir in chocolate chips until melted and smooth.
- Serve: Arrange churros on a plate with a bowl of chocolate sauce for dipping. Enjoy!
Blueberry Lemon Cheesecake Parfaits
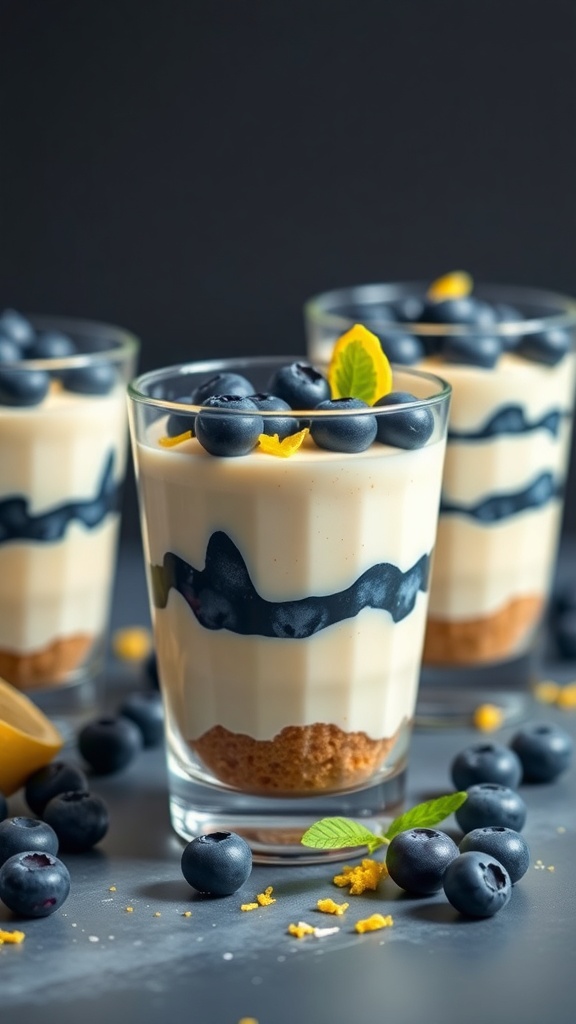
Blueberry Lemon Cheesecake Parfaits are a delightful treat that combines creamy cheesecake with the bright flavors of lemon and fresh blueberries. These parfaits are not only visually appealing but also incredibly tasty, offering a perfect balance of sweetness and tartness. They are simple to make, making them a great choice for both novice and experienced bakers.
🦈 As Seen on Shark Tank: These Kitchen Gadgets Are Flying Off the Shelves!
Auto Amazon Links: No products found.
As an Amazon Associate, I may earn a commission from qualifying purchases — at no extra cost to you.
Layered in individual cups, these parfaits are perfect for any occasion, whether it’s a casual family dinner or a special celebration. With just a few ingredients and minimal prep time, you can whip up a dessert that will impress everyone!
Ingredients
- 1 cup graham cracker crumbs
- 1/4 cup unsalted butter, melted
- 2 cups cream cheese, softened
- 1/2 cup powdered sugar
- 1 teaspoon vanilla extract
- 1/2 cup sour cream
- 1 tablespoon lemon juice
- 1 teaspoon lemon zest
- 2 cups fresh blueberries
- Mint leaves for garnish (optional)
Instructions
- Prepare the Crust: In a bowl, mix graham cracker crumbs and melted butter until combined. Divide the mixture evenly among serving glasses, pressing it down to form a crust layer.
- Make the Cheesecake Filling: In a mixing bowl, beat together the cream cheese, powdered sugar, vanilla extract, sour cream, lemon juice, and lemon zest until smooth and creamy.
- Layer the Parfaits: Spoon a layer of the cheesecake filling over the crust in each glass, followed by a layer of fresh blueberries. Repeat the layers until the glasses are filled, finishing with a layer of blueberries on top.
- Chill: Refrigerate the parfaits for at least 2 hours to allow the flavors to meld and the cheesecake to set.
- Serve: Garnish with mint leaves if desired, and enjoy your delicious Blueberry Lemon Cheesecake Parfaits!
Mango Sticky Rice with Coconut Cream
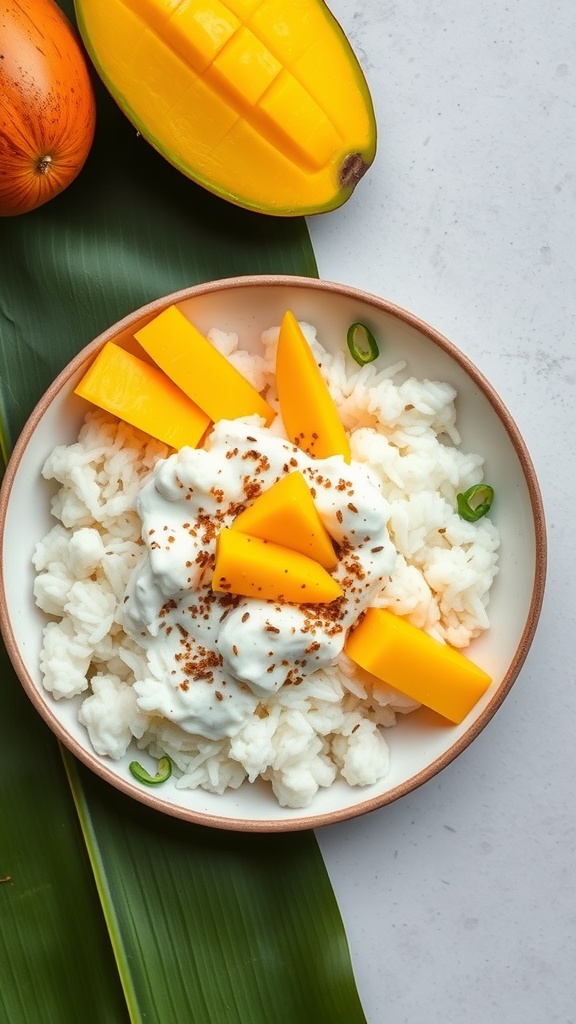
Mango Sticky Rice with Coconut Cream is a delightful dessert that brings together sweet mango, creamy coconut, and sticky rice. This dish is a popular treat in many Southeast Asian countries, especially Thailand. The combination of flavors is simply amazing, with the sweetness of the mango balancing the rich coconut cream.
Making this dessert is quite simple and requires just a few ingredients. It’s perfect for any occasion, whether you’re hosting a dinner party or just treating yourself. The vibrant colors and textures make it visually appealing, and the taste is sure to impress!
Ingredients
- 1 cup glutinous rice
- 1 1/2 cups coconut milk
- 1/2 cup sugar
- 1/4 teaspoon salt
- 2 ripe mangoes, peeled and sliced
- Sesame seeds or mung beans for garnish (optional)
Instructions
- Rinse the glutinous rice under cold water until the water runs clear. Soak the rice in water for at least 4 hours or overnight.
- Drain the rice and steam it in a bamboo or metal steamer for about 30 minutes until cooked and sticky.
- In a saucepan, combine the coconut milk, sugar, and salt. Heat over low heat until the sugar dissolves, but do not boil.
- Once the rice is cooked, transfer it to a bowl and pour about 1 cup of the coconut milk mixture over it. Stir well and let it sit for about 30 minutes to absorb the flavors.
- To serve, place a portion of the sticky rice on a plate, top it with mango slices, and drizzle with the remaining coconut milk mixture. Garnish with sesame seeds or mung beans if desired.
Almond Joy Cake with Coconut Frosting
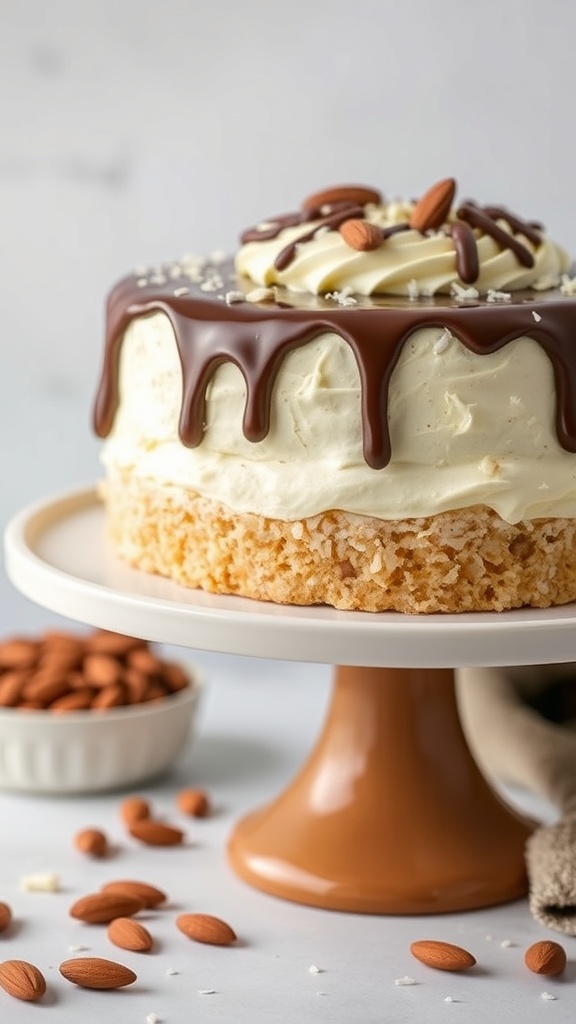
This Almond Joy Cake is a delightful treat that brings together the rich flavors of chocolate, almond, and coconut. It’s moist, sweet, and has a lovely texture that will remind you of the classic candy bar. Perfect for any occasion, this cake is simple to make, making it a great choice for both novice and experienced bakers.
The combination of creamy coconut frosting and a chocolate ganache drizzle makes this cake not only delicious but also visually stunning. Each bite is a little piece of heaven, and it’s sure to impress your friends and family!
Ingredients
- 1 ½ cups all-purpose flour
- 1 cup granulated sugar
- ½ cup unsweetened cocoa powder
- 1 teaspoon baking powder
- ½ teaspoon baking soda
- ¼ teaspoon salt
- ½ cup unsalted butter, softened
- 2 large eggs
- 1 teaspoon vanilla extract
- 1 cup buttermilk
- 1 cup shredded coconut
- ½ cup chopped almonds
- 1 cup heavy cream
- 8 ounces semi-sweet chocolate, chopped
Instructions
- Preheat the oven to 350°F (175°C). Grease and flour a 9-inch round cake pan.
- In a large bowl, mix together flour, sugar, cocoa powder, baking powder, baking soda, and salt.
- Add softened butter, eggs, and vanilla extract to the dry ingredients. Mix until combined.
- Gradually add buttermilk, mixing until the batter is smooth. Fold in shredded coconut and chopped almonds.
- Pour the batter into the prepared cake pan and bake for 30-35 minutes, or until a toothpick comes out clean.
- While the cake cools, prepare the frosting. Heat heavy cream in a saucepan until just simmering. Pour over chopped chocolate in a bowl and let sit for 5 minutes. Stir until smooth.
- Once the cake is cool, frost with the chocolate ganache and top with additional shredded coconut and almonds.
- Slice and serve. Enjoy your Almond Joy Cake!
Cherry Clafoutis with Powdered Sugar
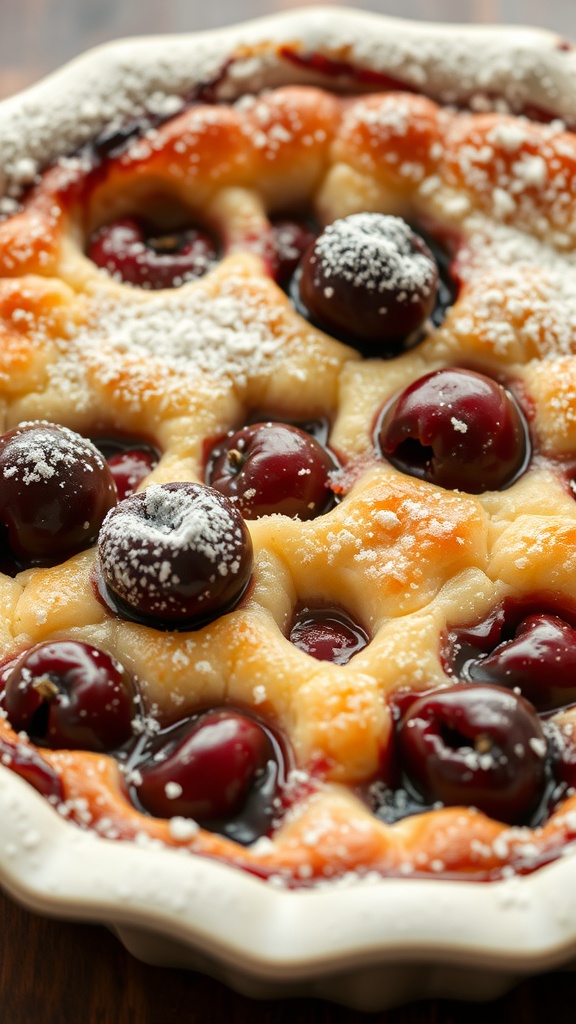
Cherry clafoutis is a delightful French dessert that combines juicy cherries with a light, custard-like batter. It’s sweet, slightly tangy, and has a lovely texture that makes it a perfect treat for any occasion. This recipe is simple to make, requiring just a few ingredients and minimal effort, making it accessible for both novice and experienced bakers.
The best part? You can enjoy it warm or cold, and a dusting of powdered sugar on top adds a charming finish. Perfect for a cozy family dinner or a casual gathering with friends, this clafoutis is sure to impress!
Ingredients
- 2 cups fresh cherries, pitted
- 3 large eggs
- 1 cup milk
- 1/2 cup granulated sugar
- 1 teaspoon vanilla extract
- 1/4 teaspoon salt
- 1/2 cup all-purpose flour
- 2 tablespoons unsalted butter, melted
- Powdered sugar for dusting
Instructions
- Preheat the oven to 350°F (175°C). Grease a 9-inch pie dish or baking dish with butter.
- Spread the pitted cherries evenly in the bottom of the prepared dish.
- In a mixing bowl, whisk together the eggs, milk, granulated sugar, vanilla extract, and salt until well combined.
- Gradually add the flour, whisking until the batter is smooth. Stir in the melted butter.
- Pour the batter over the cherries in the dish.
- Bake for 35-40 minutes, or until the clafoutis is puffed and golden brown.
- Let it cool slightly before dusting with powdered sugar. Serve warm or at room temperature.
Mocha Almond Fudge Ice Cream
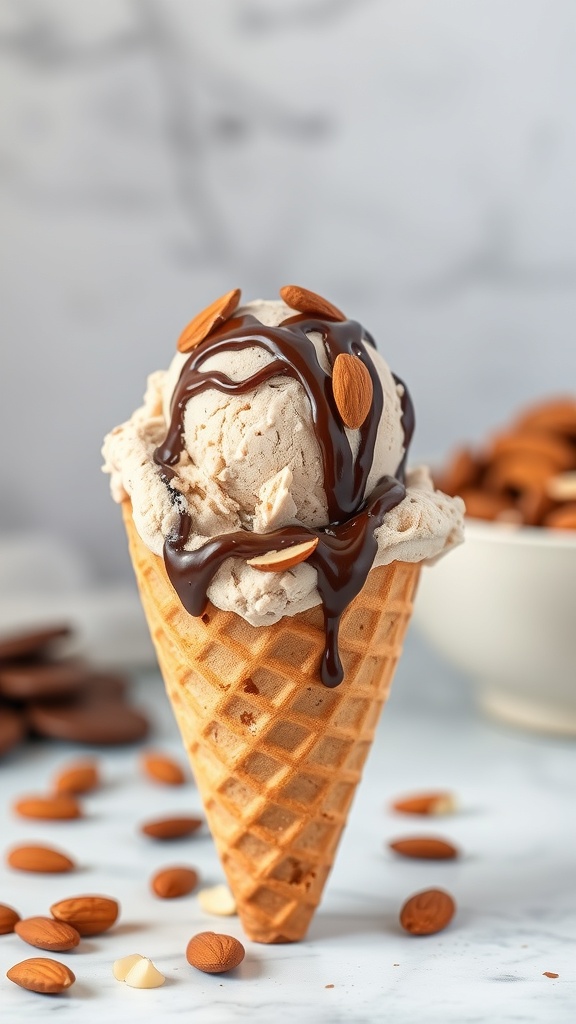
Mocha Almond Fudge Ice Cream is a delightful treat that combines rich coffee flavor with crunchy almonds and smooth chocolate fudge. This recipe is perfect for coffee lovers and anyone with a sweet tooth. It’s surprisingly simple to make, requiring just a few ingredients and minimal effort.
The creamy texture and the mix of flavors create a satisfying dessert that’s great for any occasion. Whether you’re enjoying a scoop on a hot day or serving it at a gathering, this ice cream is sure to impress!
Ingredients
- 2 cups heavy cream
- 1 cup whole milk
- 3/4 cup granulated sugar
- 1 tablespoon instant coffee granules
- 1 teaspoon vanilla extract
- 1/2 cup chopped almonds
- 1/2 cup chocolate fudge sauce
Instructions
- Mix the Base: In a large bowl, whisk together the heavy cream, whole milk, sugar, instant coffee granules, and vanilla extract until the sugar is dissolved.
- Chill the Mixture: Cover the bowl and refrigerate the mixture for at least 2 hours or until thoroughly chilled.
- Churn the Ice Cream: Pour the chilled mixture into an ice cream maker and churn according to the manufacturer’s instructions until it reaches a soft-serve consistency.
- Add Almonds and Fudge: During the last few minutes of churning, add the chopped almonds and drizzle in the chocolate fudge sauce, allowing it to swirl through the ice cream.
- Freeze: Transfer the ice cream to an airtight container and freeze for at least 4 hours or until firm.
Salted Caramel Pecan Brownies
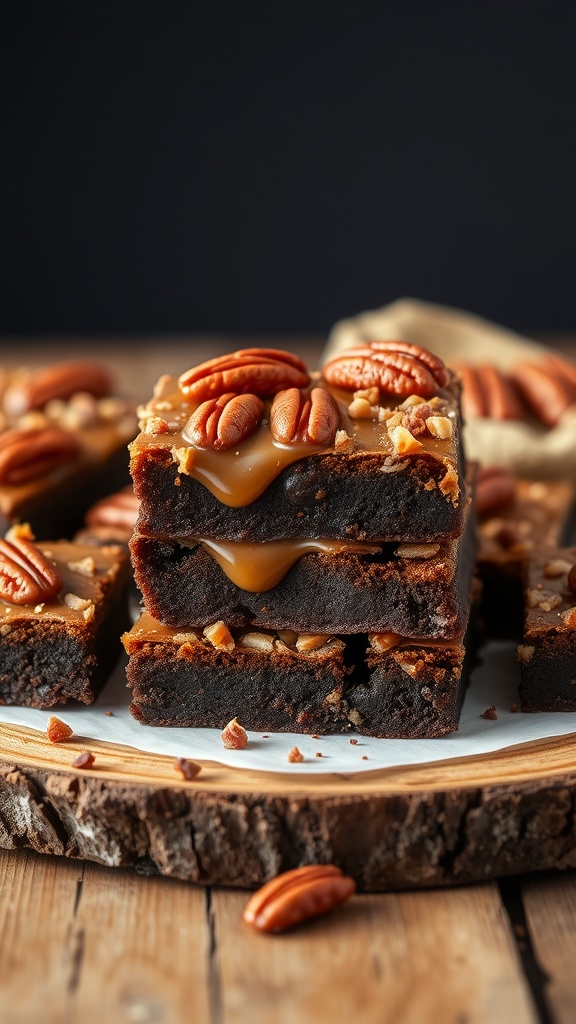
Salted Caramel Pecan Brownies are a delightful treat that combines rich chocolatey goodness with the crunch of pecans and the sweetness of caramel. These brownies are not only indulgent but also easy to whip up, making them perfect for any occasion.
The blend of flavors creates a satisfying dessert that balances sweetness with a hint of saltiness. Whether you’re serving them at a gathering or enjoying them at home, these brownies are sure to impress!
Ingredients
- 1 cup unsalted butter
- 2 cups granulated sugar
- 4 large eggs
- 1 teaspoon vanilla extract
- 1 cup all-purpose flour
- 1 cup unsweetened cocoa powder
- 1/2 teaspoon salt
- 1 cup pecans, chopped
- 1 cup salted caramel sauce
- Extra pecans for topping
Instructions
- Preheat the oven to 350°F (175°C) and grease a 9×13 inch baking pan.
- In a large saucepan, melt the butter over medium heat. Remove from heat and stir in sugar, eggs, and vanilla until well combined.
- In a separate bowl, whisk together flour, cocoa powder, and salt. Gradually add this mixture to the butter mixture, stirring until just combined.
- Fold in the chopped pecans and pour half of the brownie batter into the prepared pan.
- Drizzle half of the salted caramel sauce over the batter. Pour the remaining brownie batter on top and swirl in the rest of the caramel sauce.
- Top with extra pecans and bake for 30-35 minutes, or until a toothpick inserted comes out with a few moist crumbs.
- Let cool before slicing into squares and serving. Enjoy!
Vanilla Bean Panna Cotta with Raspberry Sauce
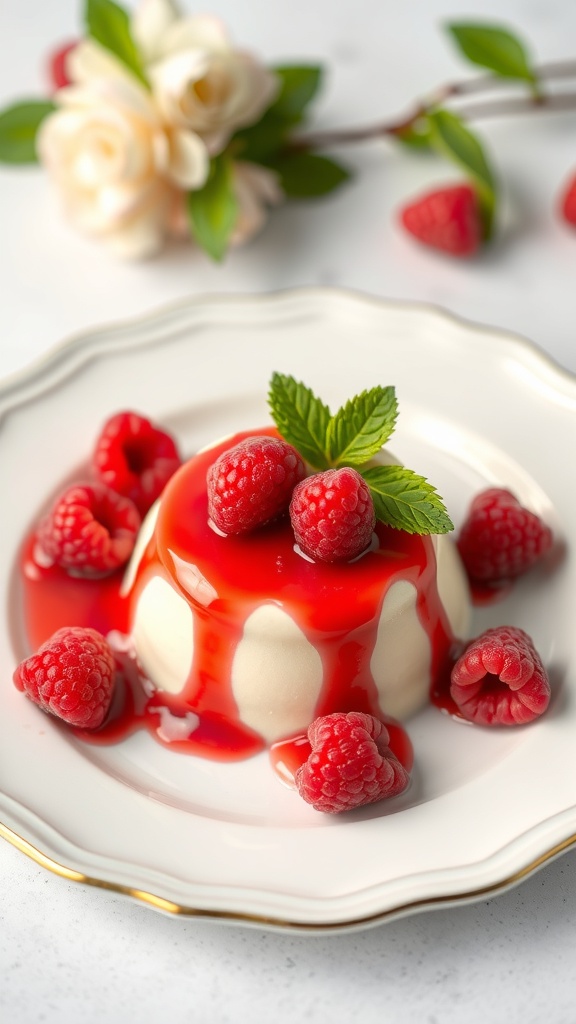
Vanilla Bean Panna Cotta is a creamy and smooth dessert that melts in your mouth. The rich vanilla flavor pairs perfectly with the tartness of raspberry sauce, creating a delightful balance. This recipe is simple to make, requiring just a few ingredients and minimal cooking time, making it perfect for both beginners and seasoned cooks.
With its elegant presentation and luscious taste, this panna cotta is sure to impress at any gathering. Whether you’re celebrating a special occasion or just treating yourself, this dessert is a fantastic choice!
Ingredients
- 2 cups heavy cream
- 1/2 cup granulated sugar
- 1 teaspoon vanilla bean paste
- 1 packet (2 1/4 teaspoons) unflavored gelatin
- 3 tablespoons cold water
- 1 cup fresh raspberries
- 1/4 cup raspberry jam
- Fresh mint leaves for garnish
Instructions
- Prepare the Gelatin: In a small bowl, sprinkle gelatin over cold water and let it sit for about 5 minutes until it blooms.
- Heat the Cream: In a saucepan, combine heavy cream, sugar, and vanilla bean paste. Heat over medium heat until the sugar dissolves and the mixture is hot but not boiling.
- Mix in Gelatin: Remove the saucepan from heat and stir in the bloomed gelatin until fully dissolved.
- Pour into Molds: Pour the mixture into individual molds or cups. Refrigerate for at least 4 hours or until set.
- Make the Raspberry Sauce: In a small saucepan, combine fresh raspberries and raspberry jam. Heat over low until the raspberries break down and the sauce thickens slightly. Let it cool.
- Serve: To serve, gently unmold the panna cotta onto plates, drizzle with raspberry sauce, and garnish with fresh mint leaves.
Lemon Blueberry Pound Cake
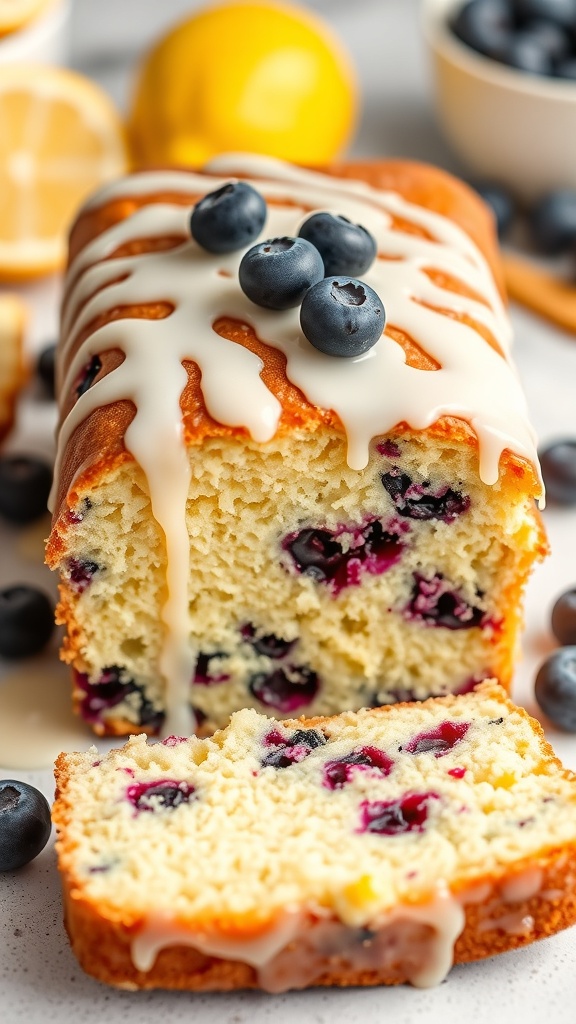
Lemon Blueberry Pound Cake is a delightful treat that perfectly balances the tartness of lemon with the sweetness of blueberries. This cake is moist, tender, and bursting with flavor, making it a fantastic dessert for any occasion.
Making this pound cake is simple and straightforward, even for beginners. With just a few ingredients and easy steps, you’ll have a delicious cake that everyone will love!
Ingredients
- 1 cup unsalted butter, softened
- 2 cups granulated sugar
- 4 large eggs
- 3 cups all-purpose flour
- 1 teaspoon baking powder
- 1/2 teaspoon salt
- 1/2 cup milk
- 1/4 cup fresh lemon juice
- 1 tablespoon lemon zest
- 1 cup fresh blueberries
- 1 cup powdered sugar (for glaze)
- 2 tablespoons lemon juice (for glaze)
Instructions
- Preheat your oven to 350°F (175°C). Grease and flour a loaf pan.
- In a large bowl, cream together the softened butter and granulated sugar until light and fluffy. Add the eggs one at a time, mixing well after each addition.
- In another bowl, whisk together the flour, baking powder, and salt. Gradually add this dry mixture to the butter mixture, alternating with the milk, until just combined.
- Stir in the lemon juice, lemon zest, and blueberries gently to avoid breaking the berries.
- Pour the batter into the prepared loaf pan and smooth the top. Bake for 60-70 minutes, or until a toothpick inserted in the center comes out clean.
- While the cake is baking, prepare the glaze by mixing powdered sugar and lemon juice until smooth.
- Once the cake is done, let it cool in the pan for 10 minutes before transferring it to a wire rack. Drizzle the glaze over the cooled cake before slicing and serving.
Coconut Macaroons Dipped in Dark Chocolate

Coconut macaroons are a delightful treat that combines the chewy goodness of coconut with a rich layer of dark chocolate. These little bites are sweet, satisfying, and have a wonderful texture that makes them hard to resist. Plus, they’re surprisingly simple to make, making them perfect for both novice bakers and seasoned pros.
The combination of toasted coconut and dark chocolate creates a flavor that’s both comforting and indulgent. Whether you’re serving them at a party or enjoying them with a cup of coffee, these macaroons are sure to impress!
Ingredients
- 3 cups sweetened shredded coconut
- 1/2 cup sweetened condensed milk
- 1 teaspoon vanilla extract
- 1/4 teaspoon salt
- 8 ounces dark chocolate, chopped
- 1 tablespoon coconut oil (optional)
Instructions
- Preheat the Oven: Preheat your oven to 325°F (160°C) and line a baking sheet with parchment paper.
- Mix the Ingredients: In a large bowl, combine the shredded coconut, sweetened condensed milk, vanilla extract, and salt. Stir until everything is well mixed.
- Form the Macaroons: Using your hands, scoop out small amounts of the mixture and shape them into balls or mounds. Place them on the prepared baking sheet, spacing them about an inch apart.
- Bake: Bake in the preheated oven for about 20-25 minutes, or until the tops are golden brown. Remove from the oven and let them cool completely on the baking sheet.
- Melt the Chocolate: While the macaroons are cooling, melt the dark chocolate in a microwave-safe bowl in 30-second intervals, stirring in between, until smooth. If desired, add coconut oil to the chocolate for a smoother consistency.
- Dip the Macaroons: Once the macaroons are cool, dip the bottoms or half of each macaroon into the melted chocolate. Place them back on the parchment paper to set.
- Let Set: Allow the chocolate to harden at room temperature or in the refrigerator for about 30 minutes before serving.
Raspberry Lemonade Sorbet
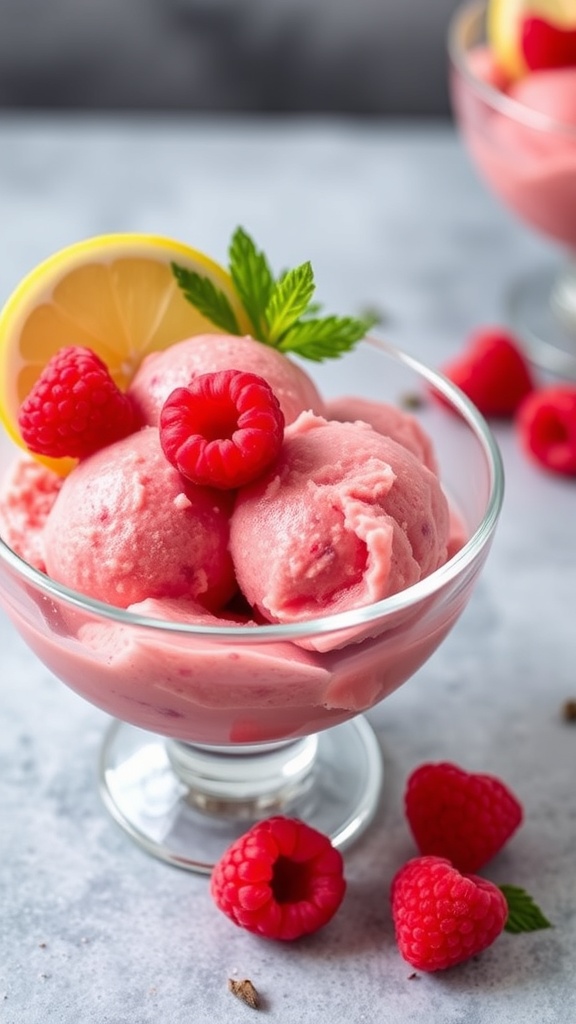
Raspberry Lemonade Sorbet is a refreshing treat that combines the sweet-tart flavors of raspberries and lemons. This sorbet is perfect for hot summer days or as a light dessert after a meal. With its vibrant color and fruity taste, it’s sure to impress your friends and family.
Making this sorbet is simple and requires just a few ingredients. You’ll love how easy it is to whip up a batch, and the result is a delightful frozen dessert that’s both satisfying and refreshing.
Ingredients
- 2 cups fresh raspberries
- 1 cup granulated sugar
- 1 cup water
- 1/2 cup freshly squeezed lemon juice
- 1 tablespoon lemon zest
Instructions
- Make the Syrup: In a small saucepan, combine sugar and water. Heat over medium heat until the sugar dissolves. Remove from heat and let cool.
- Blend the Raspberries: In a blender, combine raspberries, lemon juice, and lemon zest. Blend until smooth.
- Combine Mixtures: Strain the raspberry mixture through a fine mesh sieve into a bowl. Stir in the cooled syrup until well combined.
- Freeze: Pour the mixture into a shallow dish and freeze for about 4 hours, stirring every hour to break up ice crystals.
- Serve: Once fully frozen, scoop the sorbet into bowls and enjoy!
Carrot Cake with Cream Cheese Frosting
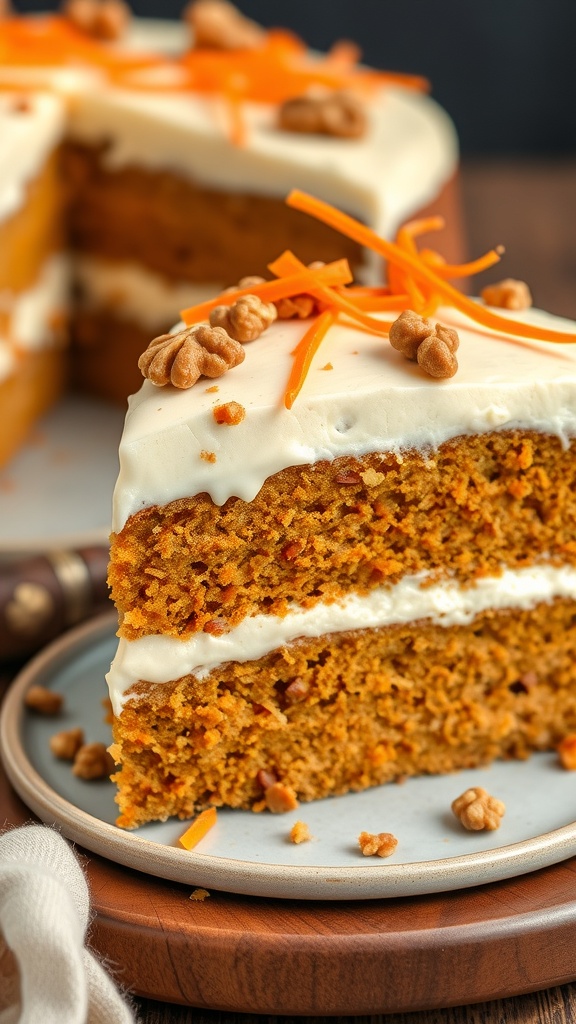
Carrot cake is a delightful dessert that combines the natural sweetness of carrots with warm spices. The moist texture and rich flavor make it a favorite for many. Topped with creamy, tangy cream cheese frosting, this cake is perfect for any occasion.
This recipe is simple to follow, making it a great choice for both beginners and seasoned bakers. You’ll love how easy it is to whip up this delicious treat!
Ingredients
- 2 cups all-purpose flour
- 2 cups granulated sugar
- 1 teaspoon baking powder
- 1 teaspoon baking soda
- 1 teaspoon ground cinnamon
- 1/2 teaspoon salt
- 1 cup vegetable oil
- 4 large eggs
- 3 cups grated carrots
- 1 cup crushed pineapple, drained
- 1 cup chopped walnuts (optional)
- 8 oz cream cheese, softened
- 1/2 cup unsalted butter, softened
- 4 cups powdered sugar
- 1 teaspoon vanilla extract
Instructions
- Preheat the oven to 350°F (175°C). Grease and flour two 9-inch round cake pans.
- In a large bowl, whisk together flour, sugar, baking powder, baking soda, cinnamon, and salt.
- In another bowl, mix oil and eggs until well combined. Stir in grated carrots and crushed pineapple.
- Add the wet ingredients to the dry ingredients and mix until just combined. Fold in walnuts if using.
- Divide the batter evenly between the prepared pans. Bake for 25-30 minutes or until a toothpick inserted in the center comes out clean.
- Let the cakes cool in the pans for 10 minutes before transferring to wire racks to cool completely.
- For the frosting, beat cream cheese and butter together until smooth. Gradually add powdered sugar and vanilla, mixing until creamy.
- Once the cakes are completely cool, spread frosting between the layers and over the top and sides of the cake. Decorate with additional walnuts or carrot shavings if desired.
Apple Crisp with Oat Topping
Apple Crisp with Oat Topping is a warm and comforting dessert that brings together sweet, tender apples and a crunchy oat topping. This dish is perfect for any occasion, whether it’s a cozy family dinner or a gathering with friends. The combination of flavors and textures makes each bite delightful, and it’s simple enough for anyone to whip up.
With just a few ingredients and minimal prep time, you can create a delicious dessert that’s sure to impress. Serve it warm with a scoop of vanilla ice cream for an extra treat!
Ingredients
- 6 cups sliced apples (about 6 medium apples)
- 1 tablespoon lemon juice
- 1/2 cup granulated sugar
- 1 teaspoon ground cinnamon
- 1/4 teaspoon salt
- 1 cup rolled oats
- 1 cup all-purpose flour
- 1/2 cup brown sugar, packed
- 1/2 cup unsalted butter, melted
Instructions
- Preheat the oven to 350°F (175°C). Grease a 9×13-inch baking dish.
- In a large bowl, toss the sliced apples with lemon juice, granulated sugar, cinnamon, and salt. Spread the apple mixture evenly in the prepared baking dish.
- In another bowl, combine rolled oats, flour, brown sugar, and melted butter. Mix until crumbly.
- Sprinkle the oat mixture over the apples, covering them evenly.
- Bake for 30-35 minutes, or until the apples are tender and the topping is golden brown.
- Let it cool slightly before serving. Enjoy warm with vanilla ice cream!
Tiramisu with Espresso and Cocoa
Tiramisu is a classic Italian dessert that combines layers of coffee-soaked ladyfingers with a rich mascarpone cream. The blend of espresso and cocoa gives it a delightful coffee flavor, balanced by the sweetness of the cream. This dessert is not only delicious but also surprisingly simple to make, making it perfect for both beginners and seasoned bakers.
The creamy texture and coffee kick make tiramisu a favorite for many. It’s a great choice for gatherings or a cozy night in. Plus, it can be prepared ahead of time, allowing the flavors to meld beautifully.
Ingredients
- 6 egg yolks
- 3/4 cup granulated sugar
- 2/3 cup milk
- 1 1/4 cups heavy cream
- 1 cup mascarpone cheese
- 1 cup strong brewed espresso, cooled
- 24 ladyfingers
- 2 tablespoons cocoa powder
- Dark chocolate shavings (optional, for garnish)
Instructions
- Make the Cream: In a saucepan, whisk together egg yolks and sugar over medium heat. Gradually add milk, stirring constantly until the mixture thickens. Remove from heat and let it cool.
- Whip the Cream: In a separate bowl, whip the heavy cream until soft peaks form. Gently fold in the mascarpone cheese until smooth.
- Combine: Once the egg mixture is cool, fold it into the mascarpone mixture until well combined.
- Prepare the Ladyfingers: Dip each ladyfinger into the cooled espresso for a few seconds, ensuring they soak up some coffee but don’t become too soggy.
- Layer: In a dish, layer half of the soaked ladyfingers, followed by half of the cream mixture. Repeat with the remaining ladyfingers and cream.
- Chill: Cover and refrigerate for at least 4 hours, or overnight for best results.
- Serve: Before serving, dust the top with cocoa powder and add dark chocolate shavings if desired.
Chocolate Chip Cookie Skillet with Ice Cream
This Chocolate Chip Cookie Skillet with Ice Cream is a delightful treat that combines warm, gooey cookie goodness with the coolness of ice cream. It’s perfect for sharing or for indulging all by yourself! The flavors of rich chocolate and buttery cookie come together in a way that’s simply irresistible.
Making this dessert is a breeze. With just a few simple ingredients and minimal prep time, you’ll have a warm, melty cookie ready to enjoy in no time. It’s a fun way to elevate a classic dessert, and who can resist that scoop of ice cream on top?
Ingredients
- 1 cup unsalted butter, softened
- 3/4 cup granulated sugar
- 3/4 cup brown sugar, packed
- 1 teaspoon vanilla extract
- 2 large eggs
- 2 1/4 cups all-purpose flour
- 1 teaspoon baking soda
- 1/2 teaspoon salt
- 2 cups chocolate chips
- Ice cream, for serving
- Chocolate sauce, for drizzling
Instructions
- Preheat your oven to 350°F (175°C) and grease a cast-iron skillet.
- In a large bowl, cream together the softened butter, granulated sugar, and brown sugar until smooth. Mix in the vanilla extract and eggs until well combined.
- In another bowl, whisk together the flour, baking soda, and salt. Gradually add this dry mixture to the wet ingredients, stirring until just combined. Fold in the chocolate chips.
- Spread the cookie dough evenly in the prepared skillet. Bake for 25-30 minutes, or until the edges are golden brown and the center is set.
- Remove from the oven and let it cool slightly. Top with a scoop of ice cream and drizzle with chocolate sauce before serving.
Banana Foster with Rum Sauce
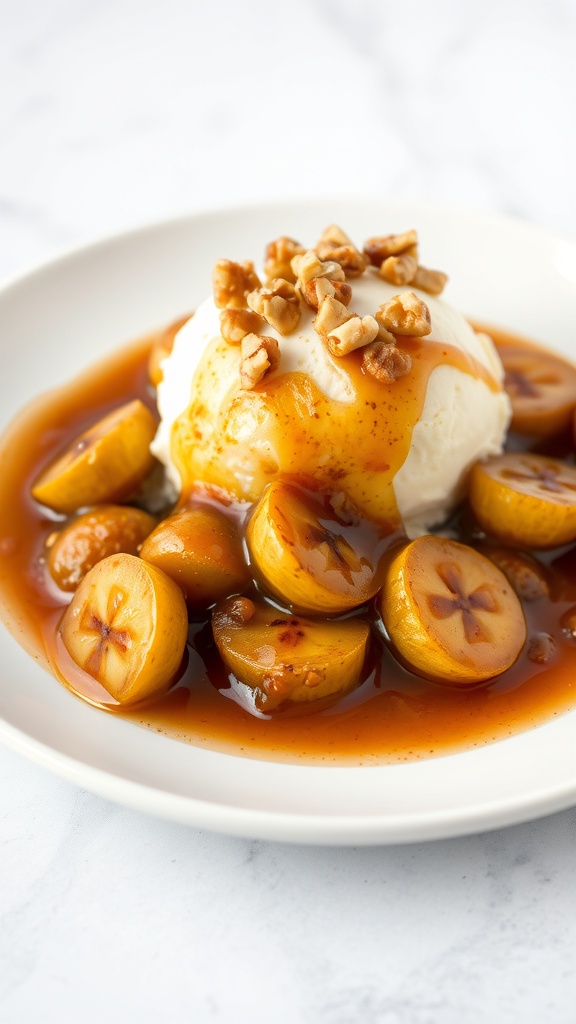
Banana Foster is a delightful dessert that combines warm, caramelized bananas with a rich rum sauce, served over creamy vanilla ice cream. The flavors are a perfect blend of sweetness and warmth, making it an irresistible treat for any occasion.
This recipe is simple to make and can be prepared in under 20 minutes. It’s a great way to impress your guests or enjoy a cozy night in with a delicious dessert.
Ingredients
- 4 ripe bananas, sliced
- 1/2 cup unsalted butter
- 1 cup brown sugar
- 1/4 cup dark rum
- 1 teaspoon vanilla extract
- 1/2 teaspoon ground cinnamon
- Vanilla ice cream, for serving
- Chopped walnuts, for garnish
Instructions
- In a large skillet, melt the butter over medium heat. Add the brown sugar and stir until it dissolves and forms a syrup.
- Stir in the sliced bananas, cooking for about 2-3 minutes until they are tender and coated in the syrup.
- Carefully add the rum and vanilla extract, then ignite the mixture with a long lighter to flambé. Allow the flames to subside as the alcohol cooks off.
- Sprinkle in the ground cinnamon and mix well.
- Serve the warm banana mixture over scoops of vanilla ice cream and top with chopped walnuts.
Mango Coconut Chia Pudding
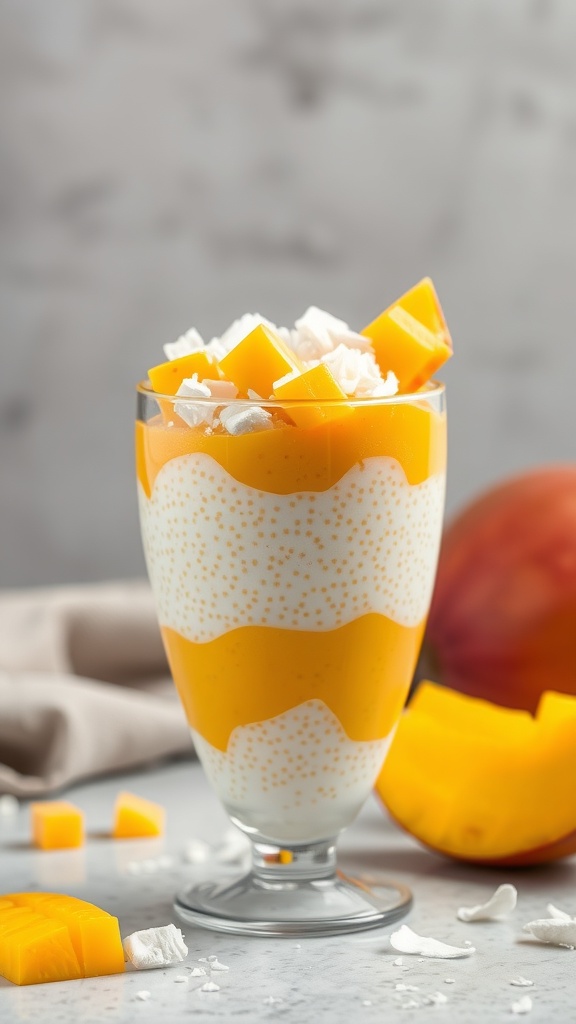
Mango Coconut Chia Pudding is a delightful treat that combines the tropical flavors of mango and coconut with the health benefits of chia seeds. This pudding is creamy, refreshing, and has a hint of sweetness, making it perfect for a light dessert or a nutritious breakfast. Plus, it’s super easy to whip up!
With just a few simple ingredients, you can create a beautiful layered dessert that looks as good as it tastes. The chia seeds provide a satisfying texture, while the mango adds a burst of fruity flavor. This recipe is not only delicious but also packed with nutrients, making it a guilt-free indulgence.
Ingredients
- 1 cup coconut milk
- 1/4 cup chia seeds
- 2 tablespoons honey or maple syrup
- 1 ripe mango, pureed
- 1/2 teaspoon vanilla extract
- Pinch of salt
- Fresh mango cubes and shredded coconut for topping
Instructions
- In a bowl, mix coconut milk, chia seeds, honey, vanilla extract, and salt. Stir well to combine.
- Cover the mixture and refrigerate for at least 4 hours or overnight until it thickens.
- Once thickened, layer the chia pudding with mango puree in serving glasses.
- Top with fresh mango cubes and shredded coconut for added texture and flavor.
- Serve chilled and enjoy your tropical treat!
Raspberry Almond Tarts
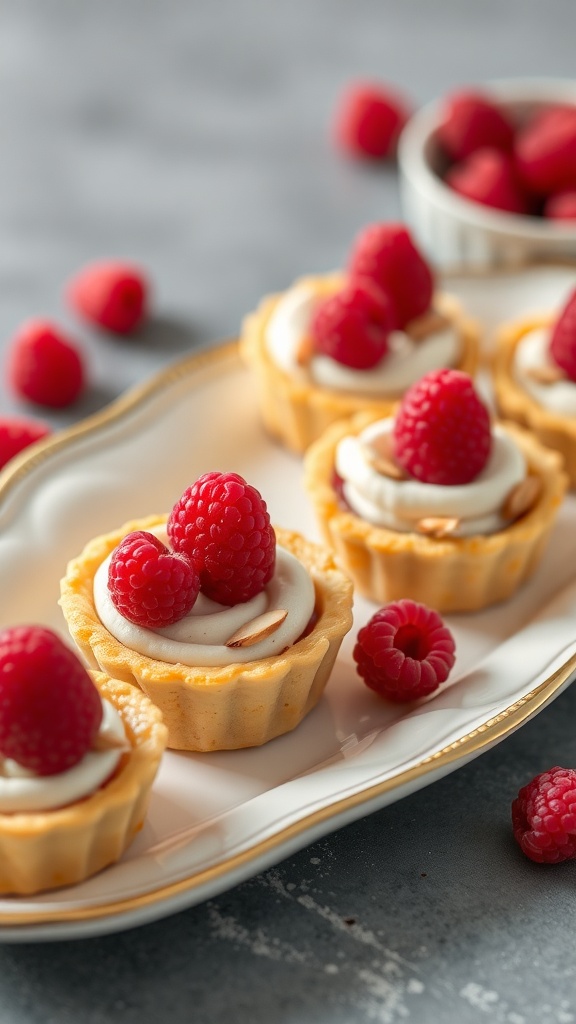
Raspberry almond tarts are a delightful treat that combines the sweetness of raspberries with the nutty flavor of almonds. These little tarts are not only tasty but also simple to make, making them perfect for any occasion.
The buttery crust pairs beautifully with the creamy filling and fresh raspberries on top. Each bite offers a burst of flavor that’s sure to impress your family and friends!
Ingredients
- 1 cup all-purpose flour
- 1/4 cup powdered sugar
- 1/2 cup unsalted butter, softened
- 1/4 teaspoon salt
- 1 large egg yolk
- 1/2 cup almond meal
- 1/2 cup cream cheese, softened
- 1/4 cup granulated sugar
- 1 teaspoon vanilla extract
- 1 cup fresh raspberries
- Sliced almonds for garnish
Instructions
- Make the Crust: In a bowl, mix flour, powdered sugar, and salt. Cut in the butter until crumbly. Stir in the egg yolk until the dough forms. Press into tartlet pans and chill for 30 minutes.
- Preheat the Oven: Set your oven to 350°F (175°C). Bake the crusts for about 15 minutes until lightly golden. Let them cool.
- Prepare the Filling: In a bowl, beat together cream cheese, granulated sugar, almond meal, and vanilla until smooth. Spoon the mixture into the cooled tart shells.
- Add Raspberries: Top each tart with fresh raspberries and sprinkle with sliced almonds.
- Chill and Serve: Refrigerate for at least 1 hour before serving. Enjoy your delicious raspberry almond tarts!
Chocolate Hazelnut Mousse
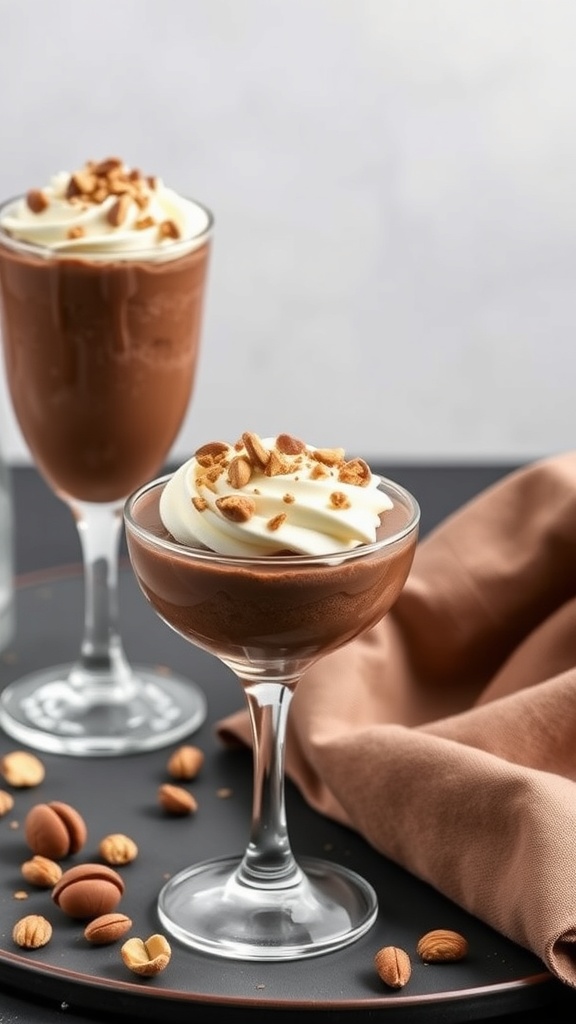
Chocolate hazelnut mousse is a rich and creamy dessert that combines the deep flavors of chocolate with the nutty essence of hazelnuts. This treat is not only delicious but also surprisingly easy to whip up, making it perfect for both special occasions and casual gatherings.
The smooth texture and sweet taste of this mousse will surely impress your guests. Topped with whipped cream and crushed hazelnuts, it’s a delightful way to satisfy your sweet tooth!
Ingredients
- 1 cup heavy cream
- 1/2 cup chocolate hazelnut spread
- 1/4 cup powdered sugar
- 1 teaspoon vanilla extract
- 2 large eggs, separated
- 1/4 cup finely chopped hazelnuts
- Whipped cream for topping
Instructions
- Whip the Cream: In a mixing bowl, beat the heavy cream until soft peaks form. Gradually add powdered sugar and vanilla extract, continuing to whip until stiff peaks form. Set aside.
- Mix Chocolate and Eggs: In another bowl, combine the chocolate hazelnut spread and egg yolks. Mix until smooth and well combined.
- Fold in the Cream: Gently fold the whipped cream into the chocolate mixture until no streaks remain.
- Beat Egg Whites: In a clean bowl, beat the egg whites until stiff peaks form. Carefully fold the egg whites into the chocolate mixture in thirds, ensuring not to deflate the mixture.
- Chill: Spoon the mousse into serving dishes and refrigerate for at least 2 hours to set.
- Serve: Before serving, top with whipped cream and sprinkle with chopped hazelnuts for added crunch.
Salted Caramel Brownies
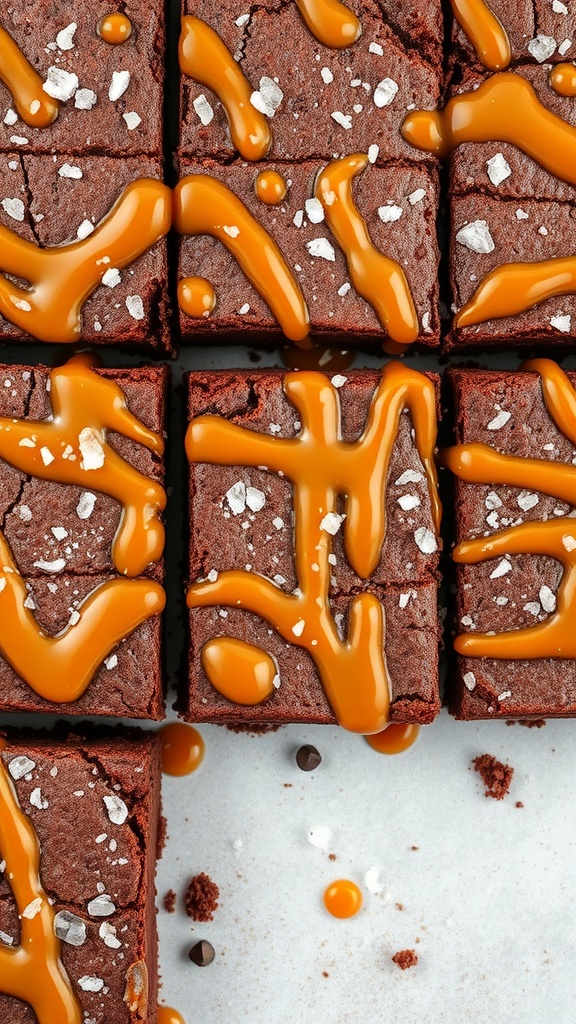
Salted caramel brownies are a delightful treat that combines rich chocolate with a luscious caramel drizzle. The sweet and salty contrast makes every bite irresistible. Plus, they are simple to whip up, making them perfect for any occasion.
These brownies are fudgy and decadent, with a gooey caramel topping that adds a special touch. Whether you’re baking for a party or just craving something sweet, these brownies will surely hit the spot!
Ingredients
- 1 cup unsalted butter
- 2 cups granulated sugar
- 4 large eggs
- 1 teaspoon vanilla extract
- 1 cup all-purpose flour
- 1 cup unsweetened cocoa powder
- 1 teaspoon baking powder
- 1/2 teaspoon salt
- 1 cup caramel sauce
- 1 teaspoon sea salt flakes (for topping)
Instructions
- Preheat the oven to 350°F (175°C). Grease a 9×13 inch baking pan.
- In a saucepan, melt the butter over medium heat. Once melted, remove from heat and stir in the sugar until well combined.
- Add the eggs one at a time, mixing well after each addition. Stir in the vanilla extract.
- In a separate bowl, whisk together the flour, cocoa powder, baking powder, and salt. Gradually add the dry ingredients to the wet mixture, stirring until just combined.
- Pour half of the brownie batter into the prepared pan and spread evenly. Drizzle half of the caramel sauce over the batter.
- Pour the remaining brownie batter on top and swirl in the rest of the caramel sauce. Use a knife to create a marbled effect.
- Bake for 25-30 minutes, or until a toothpick inserted in the center comes out with a few moist crumbs.
- Once baked, remove from the oven and sprinkle sea salt flakes on top while still warm. Allow to cool before cutting into squares.
Caramel Pecan Sticky Buns
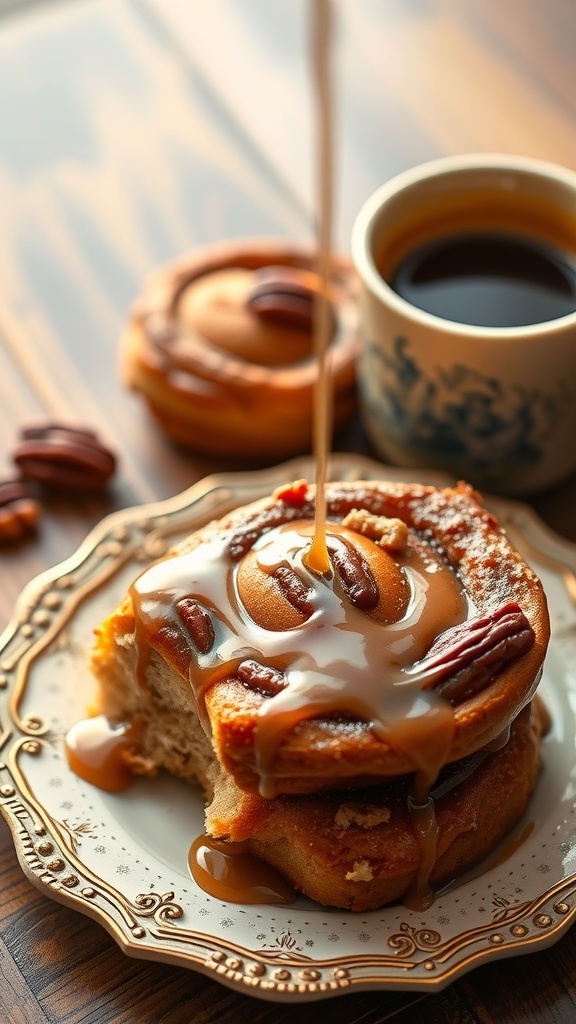
Caramel pecan sticky buns are a delightful treat that combines the rich flavors of caramel and toasted pecans with soft, fluffy dough. These buns are sweet, gooey, and perfect for breakfast or dessert. The warm, sticky topping makes each bite a little piece of heaven.
This recipe is simple enough for anyone to try, even if you’re not an experienced baker. With just a few ingredients and some patience, you can create a batch that will impress your family and friends.
Ingredients
- 4 cups all-purpose flour
- 1/4 cup granulated sugar
- 2 1/4 teaspoons active dry yeast
- 1 teaspoon salt
- 1/4 cup unsalted butter, melted
- 1 cup milk, warmed
- 2 large eggs
- 1/2 cup brown sugar, packed
- 1 cup pecans, chopped
- 1/2 cup caramel sauce
Instructions
- Prepare the Dough: In a large bowl, combine warmed milk, sugar, and yeast. Let it sit for about 5 minutes until foamy. Stir in melted butter, eggs, and salt. Gradually add flour, mixing until a soft dough forms.
- Knead the Dough: Turn the dough onto a floured surface and knead for about 5-7 minutes until smooth and elastic. Place in a greased bowl, cover, and let rise in a warm place until doubled in size, about 1 hour.
- Make the Filling: In a small bowl, mix brown sugar and chopped pecans. Roll out the dough into a rectangle, spread softened butter over the surface, and sprinkle the pecan mixture evenly. Roll tightly and slice into individual rolls.
- Bake the Rolls: Place the rolls in a greased baking dish and pour caramel sauce over the top. Let rise for another 30 minutes. Preheat the oven to 350°F (175°C). Bake for 25-30 minutes until golden brown.
- Serve: Allow the buns to cool slightly before serving. Drizzle with extra caramel sauce if desired.
Peach Cobbler with Vanilla Ice Cream
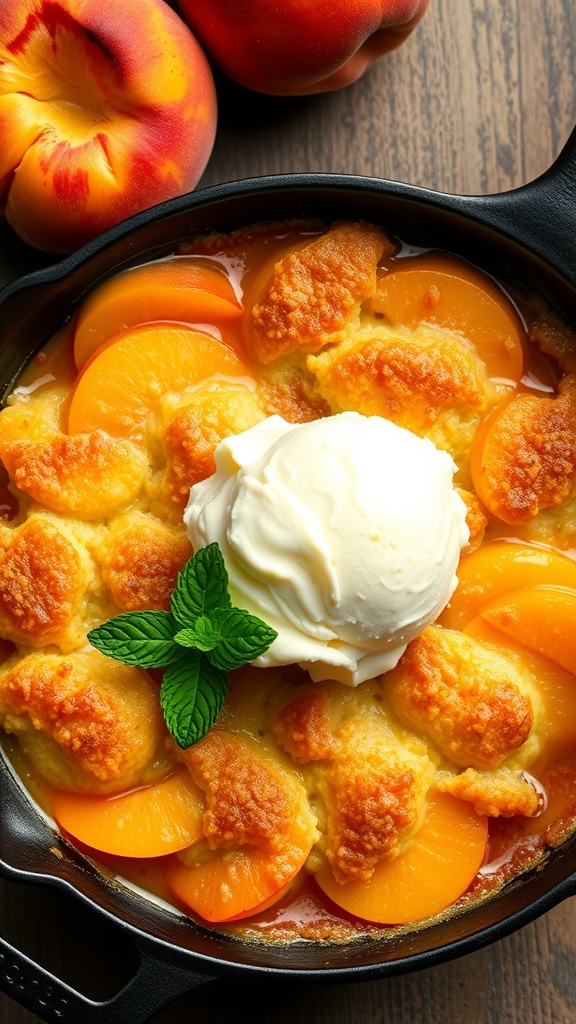
This peach cobbler is a delightful dessert that combines juicy peaches with a soft, buttery topping. It’s warm, comforting, and pairs perfectly with a scoop of vanilla ice cream. The sweetness of the peaches and the richness of the ice cream create a delicious balance that everyone will love.
Making this cobbler is simple and doesn’t require any fancy techniques. Just mix, bake, and enjoy! It’s a great way to impress guests or treat yourself after a long day.
Ingredients
- 4 cups fresh peaches, sliced
- 1 cup granulated sugar
- 1 teaspoon cinnamon
- 1 tablespoon lemon juice
- 1 cup all-purpose flour
- 1 tablespoon baking powder
- 1/2 teaspoon salt
- 1 cup milk
- 1/2 cup unsalted butter, melted
- Vanilla ice cream, for serving
Instructions
- Preheat your oven to 350°F (175°C).
- In a large bowl, combine sliced peaches, 1/2 cup sugar, cinnamon, and lemon juice. Mix well and set aside.
- In another bowl, whisk together flour, baking powder, salt, and the remaining 1/2 cup sugar. Stir in milk and melted butter until just combined.
- Pour the peach mixture into a greased baking dish. Spoon the batter over the peaches, spreading it evenly.
- Bake for 40-45 minutes or until the top is golden brown and a toothpick comes out clean.
- Let it cool slightly before serving. Top with a scoop of vanilla ice cream and enjoy!
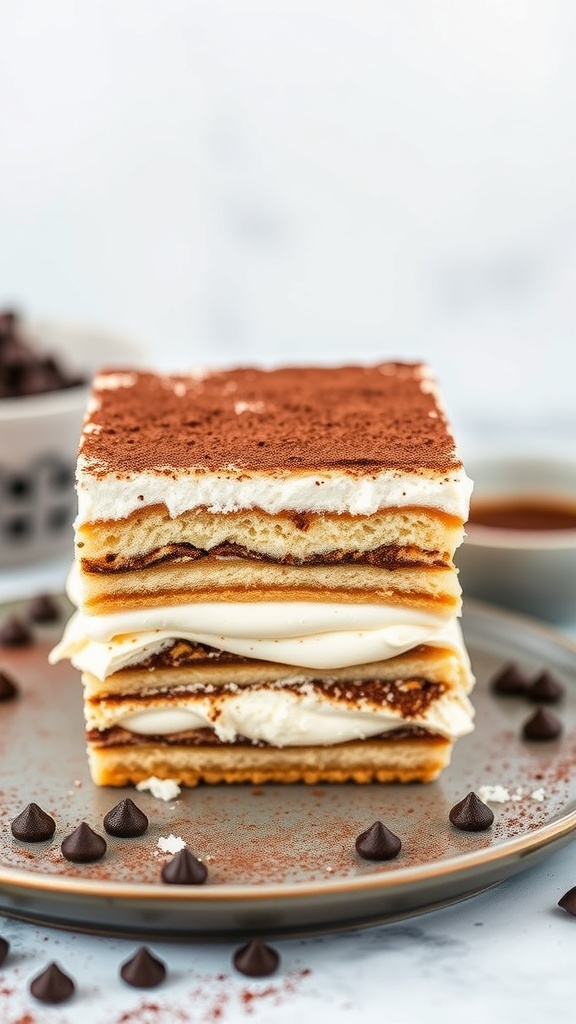
Classic Tiramisu

Classic tiramisu is a delightful Italian dessert that layers coffee-soaked ladyfingers with a rich mascarpone cream. The combination of coffee and cocoa creates a balanced flavor that’s both sweet and slightly bitter, making it a favorite for many. This dessert is surprisingly simple to make, requiring no baking, which makes it perfect for both novice and experienced cooks.
With its creamy texture and coffee kick, tiramisu is a crowd-pleaser at any gathering. It’s a great way to end a meal, and the best part is that it can be prepared ahead of time, allowing the flavors to meld beautifully. Let’s get started on this delicious treat!
Ingredients
- 6 egg yolks
- 3/4 cup granulated sugar
- 2/3 cup milk
- 1 1/4 cups heavy cream
- 8 ounces mascarpone cheese
- 1 cup strong brewed coffee, cooled
- 2 tablespoons coffee liqueur (optional)
- 24 ladyfingers
- Cocoa powder, for dusting
Instructions
- In a medium saucepan, whisk together egg yolks and sugar until well combined. Add milk and cook over medium heat, stirring constantly until the mixture thickens, about 5-7 minutes. Remove from heat and let cool slightly.
- In a large bowl, whip the heavy cream until stiff peaks form. Gently fold in the mascarpone cheese until smooth.
- Combine the cooled egg mixture with the mascarpone mixture, folding gently until fully incorporated.
- In a shallow dish, mix the brewed coffee with coffee liqueur. Quickly dip each ladyfinger into the coffee mixture, making sure not to soak them.
- Layer half of the dipped ladyfingers in the bottom of a serving dish. Spread half of the mascarpone mixture over the ladyfingers. Repeat with the remaining ladyfingers and mascarpone mixture.
- Cover and refrigerate for at least 4 hours, or overnight for best results. Before serving, dust the top with cocoa powder.
Matcha Green Tea Cookies

Matcha green tea cookies are a delightful treat that combines the earthy flavor of matcha with a soft, buttery texture. These cookies are not only tasty but also easy to make, making them perfect for both beginners and seasoned bakers alike.
The subtle sweetness and unique flavor of matcha create a lovely balance, making these cookies a great choice for any occasion. Whether you enjoy them with a cup of tea or as a snack, they are sure to impress!
Ingredients
- 1 cup all-purpose flour
- 1/2 cup powdered sugar
- 1/2 cup unsalted butter, softened
- 1 tablespoon matcha green tea powder
- 1/4 teaspoon salt
- 1 teaspoon vanilla extract
- 1/4 teaspoon baking powder
- Powdered sugar for dusting
Instructions
- Preheat the oven to 350°F (175°C) and line a baking sheet with parchment paper.
- In a mixing bowl, cream together the softened butter and powdered sugar until light and fluffy.
- Add the matcha powder, vanilla extract, and salt. Mix until well combined.
- Gradually add the flour and baking powder, mixing until a dough forms.
- Shape the dough into small balls and place them on the prepared baking sheet, spacing them about 2 inches apart.
- Flatten each ball slightly with your palm, then use a knife to make a cross pattern on top of each cookie.
- Bake for 10-12 minutes, or until the edges are lightly golden.
- Remove from the oven and let cool on a wire rack. Dust with powdered sugar before serving.
Nutella Stuffed Pancakes
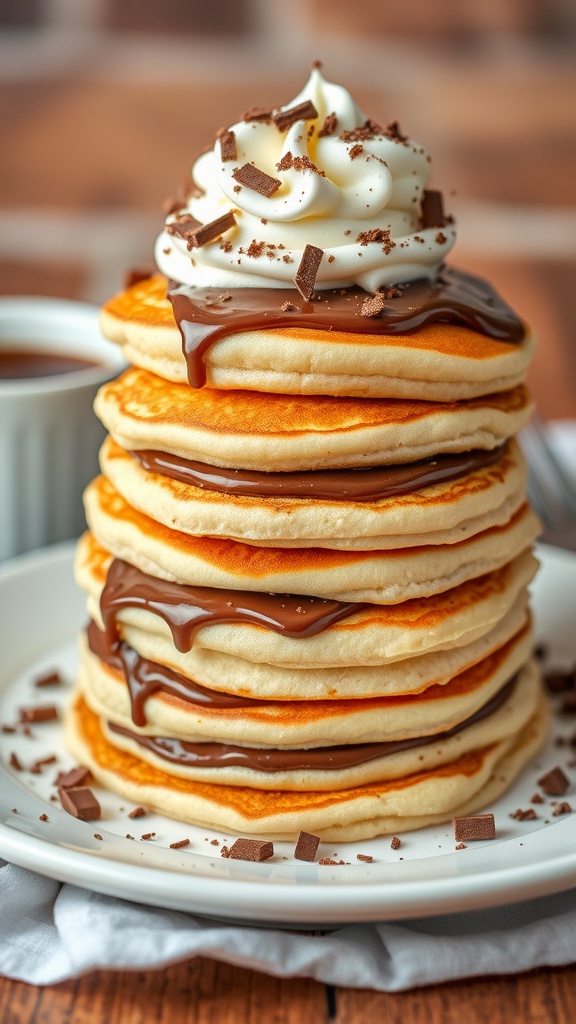
Nutella stuffed pancakes are a delightful treat that combines fluffy pancakes with rich, creamy Nutella. They are perfect for breakfast or dessert and are sure to satisfy any sweet tooth. The warm, melted chocolate hazelnut spread oozes out with every bite, making them a favorite for both kids and adults.
This recipe is simple and quick to make, requiring just a few ingredients you likely already have at home. Whether you’re cooking for a special occasion or just want to indulge on a weekend, these pancakes are a fun and delicious choice!
Ingredients
- 1 cup all-purpose flour
- 2 tablespoons sugar
- 1 tablespoon baking powder
- 1/4 teaspoon salt
- 1 cup milk
- 1 large egg
- 2 tablespoons melted butter
- Nutella (for filling)
- Whipped cream (for topping)
- Chocolate shavings (for garnish)
Instructions
- Mix Dry Ingredients: In a bowl, whisk together flour, sugar, baking powder, and salt.
- Combine Wet Ingredients: In another bowl, mix milk, egg, and melted butter until well combined.
- Combine Mixtures: Pour the wet ingredients into the dry ingredients and stir until just combined. Do not overmix; a few lumps are okay.
- Heat the Pan: Preheat a non-stick skillet over medium heat and lightly grease it.
- Cook the Pancakes: Pour about 1/4 cup of batter onto the skillet. Once bubbles form on the surface, add a spoonful of Nutella in the center and cover it with a little more batter. Cook until golden brown, then flip and cook the other side.
- Serve: Stack the pancakes on a plate, top with whipped cream, and sprinkle with chocolate shavings. Enjoy!