These gluten-free recipes celebrate creativity in the kitchen, showcasing a variety of cooking techniques that bring out vibrant flavors without the need for traditional grains. From hearty meals to delightful desserts, each dish highlights unique ingredients and innovative methods that ensure satisfying textures and delicious results. Whether you’re roasting, sautéing, or baking, these recipes make gluten-free cooking a breeze and a joy to share with friends and family.
Zucchini Noodles with Avocado Pesto

Zucchini noodles with avocado pesto are a fresh and tasty dish that’s perfect for anyone looking for a light meal. The creamy avocado pesto adds a rich flavor that pairs wonderfully with the tender zucchini noodles. This recipe is simple to make, requiring just a few ingredients and minimal cooking time.
The combination of vibrant flavors and textures makes this dish a hit for both gluten-free eaters and pasta lovers alike. Plus, it’s a great way to sneak in some veggies!
Ingredients
- 2 medium zucchinis
- 1 ripe avocado
- 1 cup fresh basil leaves
- 2 tablespoons pine nuts
- 2 tablespoons olive oil
- 1 clove garlic
- Salt and pepper to taste
- Cherry tomatoes, halved (for garnish)
- Extra pine nuts (for garnish)
Instructions
- Spiralize the Zucchini: Use a spiralizer to turn the zucchinis into noodles. If you don’t have a spiralizer, you can use a vegetable peeler to create thin strips.
- Make the Pesto: In a blender or food processor, combine the avocado, basil, pine nuts, olive oil, garlic, salt, and pepper. Blend until smooth and creamy.
- Toss the Noodles: In a large bowl, combine the zucchini noodles with the avocado pesto. Toss until the noodles are well coated.
- Serve: Plate the zucchini noodles and top with halved cherry tomatoes and extra pine nuts for garnish. Enjoy immediately!
Almond Flour Chocolate Chip Cookies

These almond flour chocolate chip cookies are a delightful treat that everyone can enjoy. They have a rich, nutty flavor and a chewy texture that pairs perfectly with the sweetness of chocolate chips. Plus, they’re gluten-free, making them a great option for those with dietary restrictions.
Making these cookies is a breeze! With just a few simple ingredients and minimal prep time, you’ll have a batch of warm, gooey cookies ready to share (or keep all to yourself!).
Ingredients
- 2 cups almond flour
- 1/2 teaspoon baking soda
- 1/4 teaspoon salt
- 1/4 cup coconut oil, melted
- 1/4 cup honey or maple syrup
- 1 teaspoon vanilla extract
- 1/2 cup chocolate chips
Instructions
- Preheat the oven to 350°F (175°C) and line a baking sheet with parchment paper.
- In a bowl, mix together almond flour, baking soda, and salt.
- In another bowl, combine melted coconut oil, honey (or maple syrup), and vanilla extract. Stir until well blended.
- Gradually add the dry ingredients to the wet ingredients, mixing until a dough forms. Fold in the chocolate chips.
- Using a spoon, scoop out dough and place it on the prepared baking sheet, leaving space between each cookie.
- Bake for 10-12 minutes, or until the edges are golden brown. Let cool on the baking sheet for a few minutes before transferring to a wire rack.
Gluten-Free Spinach and Feta Quiche

This gluten-free spinach and feta quiche is a delightful dish that combines fresh spinach with creamy feta cheese. The flavors blend beautifully, creating a savory treat that’s perfect for breakfast, brunch, or even a light dinner.
Making this quiche is simple and quick, making it a great option for busy days. With its flaky crust and rich filling, it’s sure to please everyone at the table, whether they follow a gluten-free diet or not!
Ingredients
- 1 gluten-free pie crust
- 2 cups fresh spinach, chopped
- 1 cup feta cheese, crumbled
- 4 large eggs
- 1 cup milk
- 1/2 teaspoon salt
- 1/4 teaspoon black pepper
- 1/4 teaspoon garlic powder
- 1/4 teaspoon onion powder
- 1 tablespoon olive oil
Instructions
- Preheat the oven to 375°F (190°C).
- In a skillet, heat olive oil over medium heat. Add chopped spinach and sauté until wilted, about 2-3 minutes.
- In a mixing bowl, whisk together eggs, milk, salt, pepper, garlic powder, and onion powder.
- Spread the sautéed spinach evenly over the gluten-free pie crust. Sprinkle crumbled feta cheese on top.
- Pour the egg mixture over the spinach and feta, ensuring even coverage.
- Bake in the preheated oven for 30-35 minutes, or until the quiche is set and lightly golden on top.
- Let it cool for a few minutes before slicing. Serve warm or at room temperature.
Coconut Flour Pancakes with Maple Syrup

Coconut flour pancakes are a delightful twist on the classic breakfast favorite. They are light, fluffy, and have a subtle coconut flavor that pairs perfectly with maple syrup. This recipe is simple to follow, making it a great option for a quick breakfast or brunch.
These pancakes are not only gluten-free but also packed with healthy fats and fiber, making them a nutritious choice. Top them with fresh berries and a drizzle of maple syrup for a delicious start to your day!
Ingredients
- 1/2 cup coconut flour
- 1 teaspoon baking powder
- 1/4 teaspoon salt
- 4 large eggs
- 1/2 cup milk (dairy or non-dairy)
- 2 tablespoons honey or maple syrup
- 1 teaspoon vanilla extract
- Butter or oil for cooking
Instructions
- Mix Dry Ingredients: In a bowl, whisk together coconut flour, baking powder, and salt.
- Combine Wet Ingredients: In another bowl, beat the eggs and then add milk, honey (or maple syrup), and vanilla extract. Mix well.
- Combine Mixtures: Gradually add the dry ingredients to the wet ingredients, stirring until smooth. Let the batter sit for a few minutes to thicken.
- Cook Pancakes: Heat a skillet over medium heat and add a little butter or oil. Pour about 1/4 cup of batter onto the skillet for each pancake. Cook until bubbles form on the surface, then flip and cook until golden brown.
- Serve: Stack the pancakes on a plate, drizzle with maple syrup, and top with fresh berries. Enjoy!
Quinoa and Black Bean Stuffed Peppers

Quinoa and black bean stuffed peppers are a tasty and colorful dish that’s both healthy and satisfying. These vibrant peppers are filled with a hearty mixture of quinoa, black beans, corn, and spices, making them a great option for a quick weeknight dinner or a fun meal prep idea.
Not only are they gluten-free, but they’re also simple to make. Just cook the quinoa, mix in the other ingredients, stuff the peppers, and bake. You’ll have a delicious meal that’s packed with protein and flavor!
Ingredients
- 4 large bell peppers (any color)
- 1 cup quinoa, rinsed
- 2 cups vegetable broth
- 1 can (15 oz) black beans, drained and rinsed
- 1 cup corn (fresh, frozen, or canned)
- 1 teaspoon cumin
- 1 teaspoon chili powder
- Salt and pepper to taste
- 1/4 cup chopped fresh cilantro (optional)
- 1 cup shredded cheese (optional)
Instructions
- Preheat your oven to 375°F (190°C).
- In a medium saucepan, combine quinoa and vegetable broth. Bring to a boil, then reduce heat to low, cover, and simmer for about 15 minutes or until the quinoa is cooked and the liquid is absorbed.
- While the quinoa is cooking, prepare the bell peppers by cutting the tops off and removing the seeds. Place them upright in a baking dish.
- In a large bowl, mix the cooked quinoa, black beans, corn, cumin, chili powder, salt, and pepper. If using, stir in the chopped cilantro.
- Stuff each bell pepper with the quinoa mixture, pressing down gently to pack it in. If desired, sprinkle cheese on top.
- Cover the baking dish with foil and bake for 25 minutes. Remove the foil and bake for an additional 10 minutes, or until the peppers are tender and the cheese is melted.
- Let cool slightly before serving. Enjoy your delicious stuffed peppers!
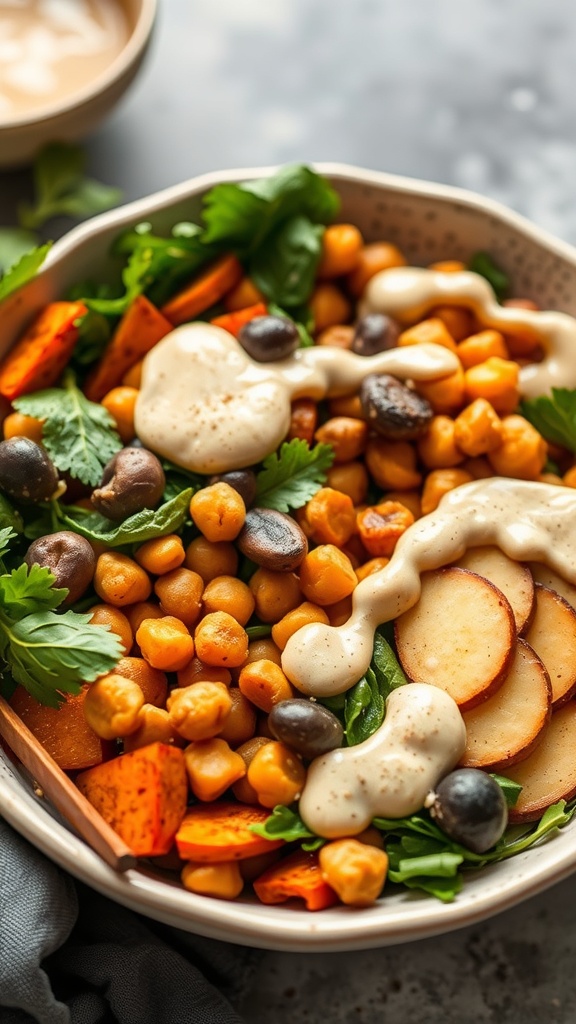
Sweet Potato and Chickpea Buddha Bowl
This Sweet Potato and Chickpea Buddha Bowl is a delightful mix of flavors and textures. It combines roasted sweet potatoes, crunchy chickpeas, and fresh greens, all topped with a creamy tahini dressing. The dish is not only tasty but also packed with nutrients, making it a great choice for a healthy meal.
Making this bowl is simple and quick, perfect for busy weeknights or meal prep. You can customize it with your favorite veggies or grains, making it a versatile option for everyone!
Ingredients
- 2 medium sweet potatoes, diced
- 1 can chickpeas, drained and rinsed
- 2 tablespoons olive oil
- 1 teaspoon paprika
- Salt and pepper, to taste
- 4 cups mixed greens (spinach, arugula, etc.)
- 1/4 cup tahini
- 2 tablespoons lemon juice
- Water, as needed for consistency
- Optional toppings: sesame seeds, chopped herbs, or nuts
Instructions
- Preheat your oven to 400°F (200°C). Toss the diced sweet potatoes and chickpeas in olive oil, paprika, salt, and pepper. Spread them on a baking sheet.
- Roast in the oven for about 25-30 minutes, or until the sweet potatoes are tender and slightly caramelized.
- While the veggies are roasting, prepare the tahini dressing by whisking together tahini, lemon juice, and enough water to reach your desired consistency.
- Once the sweet potatoes and chickpeas are done, assemble your bowl by placing the mixed greens at the bottom, followed by the roasted sweet potatoes and chickpeas.
- Drizzle the tahini dressing over the top and add any optional toppings you like. Serve immediately and enjoy!
Lentil and Vegetable Soup

Lentil and vegetable soup is a warm and hearty dish that’s perfect for any day of the week. Packed with nutrients and flavor, this soup is both satisfying and comforting. It’s simple to make and can be ready in under an hour, making it a great option for busy weeknights.
The combination of lentils and fresh vegetables creates a deliciously rich taste that will leave you feeling full and happy. Plus, it’s gluten-free, so everyone can enjoy it!
Ingredients
- 1 cup lentils, rinsed
- 1 tablespoon olive oil
- 1 onion, chopped
- 2 carrots, diced
- 2 celery stalks, diced
- 2 cloves garlic, minced
- 1 bell pepper, diced
- 1 can diced tomatoes (14.5 oz)
- 4 cups vegetable broth
- 1 teaspoon cumin
- 1 teaspoon paprika
- Salt and pepper to taste
- 1 cup spinach or kale, chopped
- Fresh parsley for garnish
Instructions
- Heat olive oil in a large pot over medium heat. Add onion, carrots, and celery. Sauté for about 5 minutes until softened.
- Add garlic and bell pepper, cooking for another 2 minutes until fragrant.
- Stir in the lentils, diced tomatoes, vegetable broth, cumin, paprika, salt, and pepper. Bring to a boil.
- Reduce heat and let simmer for 30 minutes, or until lentils are tender.
- Add spinach or kale and cook for an additional 5 minutes until wilted.
- Serve hot, garnished with fresh parsley.
Crispy Baked Chicken Thighs with Herbs

These crispy baked chicken thighs are a delightful dish that brings a burst of flavor to your table. With a golden, crunchy skin and juicy meat, they are seasoned with aromatic herbs that make every bite satisfying. This recipe is simple to follow, making it perfect for a weeknight dinner or a gathering with friends.
Cooking these thighs in the oven allows for an easy cleanup while still achieving that crispy texture everyone loves. Pair them with your favorite sides, and you have a meal that’s sure to impress!
Ingredients
- 4 chicken thighs, skin-on
- 2 chicken drumsticks, skin-on
- 2 tablespoons olive oil
- 1 teaspoon garlic powder
- 1 teaspoon onion powder
- 1 teaspoon dried thyme
- 1 teaspoon dried rosemary
- Salt and pepper to taste
- Fresh herbs for garnish (optional)
Instructions
- Preheat your oven to 425°F (220°C).
- In a large bowl, combine olive oil, garlic powder, onion powder, thyme, rosemary, salt, and pepper.
- Add the chicken thighs and drumsticks to the bowl, ensuring they are well coated with the seasoning mixture.
- Place the chicken pieces skin-side up on a baking sheet lined with parchment paper.
- Bake in the preheated oven for 35-40 minutes, or until the skin is crispy and the internal temperature reaches 165°F (75°C).
- Let the chicken rest for a few minutes before serving. Garnish with fresh herbs if desired.
Chickpea Flour Frittata with Spinach

This Chickpea Flour Frittata with Spinach is a delightful and nutritious dish that’s perfect for any meal of the day. Made with simple ingredients, it offers a light, fluffy texture and a savory taste that’s sure to please everyone. Plus, it’s gluten-free, making it a great option for those with dietary restrictions.
Making this frittata is a breeze! Just mix the chickpea flour with water and your favorite seasonings, fold in fresh spinach, and bake until golden. It’s a quick and satisfying recipe that can be enjoyed warm or cold, making it a versatile addition to your meal prep.
Ingredients
- 1 cup chickpea flour
- 1 cup water
- 1/2 teaspoon salt
- 1/4 teaspoon black pepper
- 1/2 teaspoon turmeric powder
- 1 cup fresh spinach, chopped
- 1 tablespoon olive oil
- 1/4 cup onion, finely chopped
- 1/4 cup bell pepper, diced
- Optional: nutritional yeast for a cheesy flavor
Instructions
- Preheat the oven to 375°F (190°C).
- In a bowl, whisk together chickpea flour, water, salt, pepper, and turmeric until smooth.
- In a skillet, heat olive oil over medium heat. Add onion and bell pepper, sautéing until soft.
- Add the chopped spinach to the skillet and cook until wilted.
- Combine the sautéed vegetables with the chickpea flour mixture and stir well.
- Pour the mixture into a greased baking dish and spread evenly.
- Bake for 25-30 minutes, or until the top is golden and a toothpick comes out clean.
- Let it cool slightly before slicing and serving.
Grilled Lemon Herb Shrimp Skewers

Grilled Lemon Herb Shrimp Skewers are a delightful dish that brings a burst of flavor to your table. The combination of fresh herbs and zesty lemon makes these shrimp both refreshing and satisfying. Plus, they’re super easy to whip up, making them perfect for a quick weeknight dinner or a weekend barbecue.
These skewers are not only gluten-free but also packed with protein, making them a healthy choice for any meal. The smoky char from the grill enhances the natural sweetness of the shrimp, while the lemon adds a bright touch. Serve them with a side salad or over rice for a complete meal!
Ingredients
- 1 pound large shrimp, peeled and deveined
- 3 tablespoons olive oil
- 2 tablespoons fresh lemon juice
- 1 teaspoon lemon zest
- 2 cloves garlic, minced
- 1 teaspoon dried oregano
- 1 teaspoon dried thyme
- Salt and pepper to taste
- Fresh parsley, chopped (for garnish)
- Lemon wedges (for serving)
Instructions
- Marinate the Shrimp: In a bowl, mix olive oil, lemon juice, lemon zest, garlic, oregano, thyme, salt, and pepper. Add the shrimp and toss to coat. Let it marinate for at least 15 minutes.
- Prepare the Skewers: If using wooden skewers, soak them in water for about 30 minutes to prevent burning. Thread the marinated shrimp onto the skewers.
- Preheat the Grill: Heat the grill to medium-high heat. Lightly oil the grill grates to prevent sticking.
- Grill the Shrimp: Place the skewers on the grill and cook for 2-3 minutes on each side, or until the shrimp are pink and opaque.
- Serve: Remove from the grill and garnish with fresh parsley. Serve with lemon wedges on the side.
Savory Cauliflower Pizza Crust

Cauliflower pizza crust is a fantastic gluten-free option that brings a unique twist to your pizza night. It has a mild flavor that pairs well with various toppings, making it a hit for everyone, whether you’re gluten-sensitive or just looking for a healthier alternative.
This recipe is simple to make, requiring only a few ingredients and minimal prep time. You’ll love how easy it is to whip up a delicious crust that’s crispy on the outside and tender on the inside!
Ingredients
- 1 medium head of cauliflower, riced
- 1 large egg
- 1 cup shredded mozzarella cheese
- 1/4 cup grated Parmesan cheese
- 1 teaspoon dried oregano
- 1 teaspoon garlic powder
- Salt and pepper to taste
Instructions
- Preheat the oven to 425°F (220°C). Line a baking sheet with parchment paper.
- Rice the cauliflower by grating it or processing it in a food processor until it resembles rice. Steam the riced cauliflower for about 5 minutes until tender, then let it cool.
- Once cooled, place the cauliflower in a clean kitchen towel and squeeze out as much moisture as possible.
- In a bowl, combine the riced cauliflower, egg, mozzarella cheese, Parmesan cheese, oregano, garlic powder, salt, and pepper. Mix until well combined.
- Spread the mixture onto the prepared baking sheet, shaping it into a round crust about 1/4 inch thick.
- Bake for 15-20 minutes, or until the crust is golden and firm.
- Remove from the oven, add your favorite toppings, and bake for an additional 10-15 minutes until the cheese is bubbly.
Gluten-Free Banana Oatmeal Muffins

These gluten-free banana oatmeal muffins are a delightful treat that combines the natural sweetness of ripe bananas with the hearty texture of oats. They are moist, flavorful, and perfect for breakfast or a snack. Plus, they’re super easy to whip up, making them a great choice for busy mornings.
With just a few simple ingredients, you can enjoy these muffins fresh out of the oven. They have a lovely banana flavor, complemented by the chewiness of oats, making them a satisfying option for anyone looking for a gluten-free recipe.
Ingredients
- 2 ripe bananas, mashed
- 1 cup gluten-free rolled oats
- 1/2 cup almond flour
- 1/4 cup honey or maple syrup
- 1/4 cup unsweetened applesauce
- 1 teaspoon baking powder
- 1/2 teaspoon baking soda
- 1/2 teaspoon cinnamon
- 1/4 teaspoon salt
- 1/4 cup milk of choice (dairy or non-dairy)
- 1/4 cup chopped nuts or chocolate chips (optional)
Instructions
- Preheat your oven to 350°F (175°C) and line a muffin tin with paper liners.
- In a large bowl, mix together the mashed bananas, honey (or maple syrup), and applesauce until well combined.
- Add the gluten-free rolled oats, almond flour, baking powder, baking soda, cinnamon, and salt to the banana mixture. Stir until just combined.
- Pour in the milk and mix until the batter is smooth. If desired, fold in nuts or chocolate chips.
- Scoop the batter into the prepared muffin tin, filling each cup about 2/3 full.
- Bake for 18-20 minutes, or until a toothpick inserted into the center comes out clean.
- Let the muffins cool in the pan for a few minutes before transferring them to a wire rack to cool completely.
Coconut Curry Lentil Stew

This Coconut Curry Lentil Stew is a warm hug in a bowl. It combines hearty lentils with vibrant vegetables, all simmered in a creamy coconut curry sauce. The flavors are rich and comforting, making it a perfect dish for any day of the week.
Plus, it’s super easy to whip up! Just toss everything in a pot, let it simmer, and you’ll have a delicious meal ready in no time. Whether you’re gluten-free or just looking for a tasty stew, this recipe is sure to please.
🦈 As Seen on Shark Tank: These Kitchen Gadgets Are Flying Off the Shelves!


Souper Cubes 1 Cup Silicone Freezer Molds with Lids, Aqua, 2-Pack
(as of July 5, 2026 11:25 GMT +00:00 - More infoEatMeMaybe is a participant in the Amazon Services LLC Associates Program, an affiliate advertising program designed to provide a means for sites to earn commission fees by advertising and linking to the following web sites.)


The Perfect Pizza Pack™ - Reusable Pizza Storage Container with 5 Microwavable Serving Trays - BPA-F...
(as of July 5, 2026 11:25 GMT +00:00 - More infoEatMeMaybe is a participant in the Amazon Services LLC Associates Program, an affiliate advertising program designed to provide a means for sites to earn commission fees by advertising and linking to the following web sites.)


OTOTO Splatypus Jar Spatula for Scooping and Scraping - Unique Fun Cooking Kitchen Gadgets for Foodi...
(as of July 5, 2026 11:25 GMT +00:00 - More infoEatMeMaybe is a participant in the Amazon Services LLC Associates Program, an affiliate advertising program designed to provide a means for sites to earn commission fees by advertising and linking to the following web sites.)As an Amazon Associate, I may earn a commission from qualifying purchases — at no extra cost to you.
Ingredients
- 1 cup dried lentils (any color)
- 1 can (14 oz) coconut milk
- 2 cups vegetable broth
- 1 medium onion, chopped
- 2 cloves garlic, minced
- 1 tablespoon ginger, grated
- 1 bell pepper, diced
- 1 carrot, diced
- 1 zucchini, diced
- 2 tablespoons curry powder
- 1 teaspoon turmeric
- Salt and pepper to taste
- Fresh cilantro for garnish
- Cooked rice for serving
Instructions
- In a large pot, heat a splash of oil over medium heat. Add the onion, garlic, and ginger, and sauté until the onion is translucent.
- Add the bell pepper, carrot, and zucchini. Cook for another 5 minutes, stirring occasionally.
- Stir in the curry powder and turmeric, cooking for 1 minute until fragrant.
- Add the lentils, coconut milk, and vegetable broth. Bring to a boil, then reduce heat to low and simmer for about 25-30 minutes, or until the lentils are tender.
- Season with salt and pepper to taste. Serve hot over cooked rice and garnish with fresh cilantro.
Beef and Broccoli Stir-Fry

This Beef and Broccoli Stir-Fry is a quick and tasty meal that’s perfect for busy weeknights. The tender beef pairs beautifully with crisp broccoli, all coated in a savory sauce that brings everything together. It’s a delightful mix of flavors and textures that everyone will love.
Making this dish is simple and doesn’t require any fancy cooking skills. With just a few ingredients and a hot skillet, you can whip up a delicious gluten-free dinner in no time!
Ingredients
- 1 pound beef sirloin, thinly sliced
- 2 cups broccoli florets
- 2 tablespoons gluten-free soy sauce
- 1 tablespoon cornstarch
- 2 tablespoons vegetable oil
- 2 cloves garlic, minced
- 1 teaspoon ginger, minced
- 1 tablespoon sesame oil
- Salt and pepper to taste
- Cooked rice for serving
Instructions
- Marinate the Beef: In a bowl, combine the sliced beef with gluten-free soy sauce and cornstarch. Let it sit for about 15 minutes.
- Heat the Oil: In a large skillet or wok, heat vegetable oil over medium-high heat.
- Cook the Beef: Add the marinated beef to the skillet and cook until browned, about 3-4 minutes. Remove and set aside.
- Stir-Fry the Broccoli: In the same skillet, add broccoli florets and stir-fry for about 2-3 minutes until bright green and tender-crisp.
- Add Garlic and Ginger: Stir in minced garlic and ginger, cooking for another minute until fragrant.
- Combine: Return the beef to the skillet, drizzle with sesame oil, and mix everything well. Season with salt and pepper to taste.
- Serve: Serve hot over cooked rice and enjoy your delicious Beef and Broccoli Stir-Fry!
Spaghetti Squash with Marinara Sauce

This spaghetti squash with marinara sauce is a delightful twist on traditional pasta. The squash has a mild, slightly sweet flavor that pairs perfectly with the rich, tangy marinara. It’s a simple dish to whip up, making it great for busy weeknights or a cozy weekend meal.
Not only is this recipe gluten-free, but it also offers a healthy alternative to regular pasta. The spaghetti squash creates a fun, noodle-like texture that is satisfying and delicious. Plus, it’s easy to customize with your favorite toppings!
Ingredients
- 1 medium spaghetti squash
- 2 tablespoons olive oil
- 1 teaspoon salt
- 1/2 teaspoon black pepper
- 2 cups marinara sauce
- 1/4 cup grated Parmesan cheese (optional)
- Fresh basil leaves for garnish
Instructions
- Preheat your oven to 400°F (200°C). Cut the spaghetti squash in half lengthwise and scoop out the seeds.
- Drizzle the inside of each half with olive oil, and sprinkle with salt and pepper. Place the squash cut-side down on a baking sheet.
- Bake for about 30-40 minutes, or until the flesh is tender and can be easily shredded with a fork.
- While the squash is baking, heat the marinara sauce in a saucepan over medium heat until warmed through.
- Once the squash is done, use a fork to scrape the flesh into strands. Serve the strands topped with marinara sauce, and sprinkle with Parmesan cheese and fresh basil if desired.
Baked Garlic Parmesan Brussels Sprouts

Baked Garlic Parmesan Brussels Sprouts are a tasty side dish that everyone can enjoy. These little green gems are roasted to perfection, bringing out their natural sweetness while adding a savory twist with garlic and Parmesan cheese. They’re crunchy on the outside and tender on the inside, making them a delightful addition to any meal.
This recipe is simple and quick, perfect for busy weeknights or special occasions. With just a few ingredients and minimal prep time, you can whip up a delicious dish that will impress your family and friends!
Ingredients
- 1 pound Brussels sprouts, trimmed and halved
- 3 tablespoons olive oil
- 4 cloves garlic, minced
- 1/2 cup grated Parmesan cheese
- Salt and pepper to taste
- 1 teaspoon Italian seasoning (optional)
Instructions
- Preheat your oven to 400°F (200°C).
- In a large bowl, combine the halved Brussels sprouts, olive oil, minced garlic, salt, pepper, and Italian seasoning. Toss until the Brussels sprouts are well coated.
- Spread the Brussels sprouts in a single layer on a baking sheet lined with parchment paper.
- Bake for 20-25 minutes, stirring halfway through, until they are golden brown and crispy.
- Remove from the oven and sprinkle with grated Parmesan cheese. Return to the oven for an additional 5 minutes, or until the cheese is melted and bubbly.
- Serve warm and enjoy your delicious Baked Garlic Parmesan Brussels Sprouts!
Roasted Butternut Squash Salad with Cranberries

This Roasted Butternut Squash Salad with Cranberries is a delightful mix of flavors and textures. The sweet, caramelized squash pairs perfectly with tart cranberries, creating a refreshing dish that’s both healthy and satisfying. It’s simple to make, making it a great option for a quick lunch or a side dish for dinner.
With just a few ingredients, you can whip up this salad in no time. The vibrant colors and delicious taste make it a hit at any gathering. Plus, it’s gluten-free, so everyone can enjoy it!
Ingredients
- 1 medium butternut squash, peeled and cubed
- 2 tablespoons olive oil
- Salt and pepper to taste
- 4 cups arugula
- 1 cup dried cranberries
- 1/2 cup walnuts, chopped
- 1/4 cup feta cheese (optional)
- 2 tablespoons balsamic vinegar
Instructions
- Preheat the oven to 400°F (200°C). Toss the cubed butternut squash with olive oil, salt, and pepper. Spread it on a baking sheet in a single layer.
- Roast the squash for 25-30 minutes, or until tender and slightly caramelized, stirring halfway through.
- In a large bowl, combine the arugula, roasted squash, cranberries, and walnuts. If using, sprinkle feta cheese on top.
- Drizzle with balsamic vinegar and toss gently to combine. Serve warm or at room temperature.
Gluten-Free Chocolate Avocado Mousse

This gluten-free chocolate avocado mousse is a delightful treat that combines rich chocolate flavor with creamy avocado. It’s surprisingly simple to whip up and perfect for satisfying your sweet tooth without any guilt. The mousse is velvety smooth, and the avocado adds a unique twist that makes it both healthy and delicious.
With just a few ingredients, you can create a dessert that feels indulgent yet is packed with nutrients. It’s a fantastic option for gatherings or a cozy night in, and everyone will love its luscious texture and chocolatey goodness!
Ingredients
- 2 ripe avocados
- 1/2 cup unsweetened cocoa powder
- 1/4 cup maple syrup or honey
- 1/4 cup almond milk (or any milk of choice)
- 1 teaspoon vanilla extract
- A pinch of salt
- Fresh mint leaves for garnish
Instructions
- Prepare the Avocados: Cut the avocados in half, remove the pit, and scoop the flesh into a blender or food processor.
- Add Ingredients: To the avocados, add cocoa powder, maple syrup (or honey), almond milk, vanilla extract, and a pinch of salt.
- Blend: Blend until smooth and creamy, scraping down the sides as needed. Taste and adjust sweetness if desired.
- Chill: Transfer the mousse to serving cups and refrigerate for at least 30 minutes to set.
- Serve: Garnish with fresh mint leaves before serving. Enjoy your delicious and healthy chocolate avocado mousse!
Stuffed Portobello Mushrooms with Spinach

Stuffed Portobello mushrooms with spinach are a delightful dish that packs a punch of flavor. These mushrooms are filled with a creamy spinach mixture, making them both satisfying and healthy. They are perfect as a main course or a side dish, and they’re simple enough to whip up on a weeknight.
The combination of earthy mushrooms and vibrant spinach creates a tasty treat that everyone will enjoy. Plus, they are gluten-free, making them a great option for those with dietary restrictions. Let’s get cooking!
Ingredients
- 4 large portobello mushrooms
- 2 cups fresh spinach, chopped
- 1 cup ricotta cheese
- 1/2 cup mozzarella cheese, shredded
- 1/4 cup grated Parmesan cheese
- 2 cloves garlic, minced
- 1 tablespoon olive oil
- Salt and pepper to taste
- Fresh basil for garnish
Instructions
- Preheat the oven to 375°F (190°C).
- Clean the portobello mushrooms and remove the stems. Place them on a baking sheet, gill side up.
- In a skillet, heat olive oil over medium heat. Add minced garlic and sauté for about 1 minute.
- Add chopped spinach to the skillet and cook until wilted. Remove from heat and let cool slightly.
- In a bowl, combine ricotta cheese, mozzarella cheese, Parmesan cheese, and the cooked spinach mixture. Season with salt and pepper.
- Stuff each mushroom cap with the spinach and cheese mixture, pressing down gently.
- Bake in the preheated oven for 20-25 minutes, until the mushrooms are tender and the cheese is bubbly.
- Garnish with fresh basil before serving. Enjoy!
Honey Garlic Glazed Salmon

This Honey Garlic Glazed Salmon is a delightful dish that brings together sweet and savory flavors in a simple recipe. The honey adds a touch of sweetness, while the garlic gives it a nice kick. It’s perfect for a quick weeknight dinner or a special occasion.
Making this dish is a breeze! With just a few ingredients and minimal prep time, you can have a delicious meal on the table in no time. The salmon comes out tender and flaky, coated in a glossy glaze that’s sure to impress.
Ingredients
- 4 salmon fillets
- 1/4 cup honey
- 3 cloves garlic, minced
- 2 tablespoons soy sauce (or tamari for gluten-free)
- 1 tablespoon olive oil
- 1 teaspoon sesame oil
- 1/2 teaspoon black pepper
- 2 green onions, chopped
- 1 tablespoon sesame seeds
Instructions
- Prepare the Marinade: In a bowl, whisk together honey, minced garlic, soy sauce, olive oil, sesame oil, and black pepper.
- Marinate the Salmon: Place the salmon fillets in a shallow dish and pour the marinade over them. Let it marinate for at least 15 minutes.
- Preheat the Oven: Preheat your oven to 400°F (200°C).
- Bake the Salmon: Place the marinated salmon on a lined baking sheet. Bake for 12-15 minutes, or until the salmon is cooked through and flakes easily with a fork.
- Garnish and Serve: Remove from the oven and sprinkle with chopped green onions and sesame seeds before serving.
Thai Coconut Soup with Chicken

This Thai Coconut Soup with Chicken is a warm and comforting dish that brings a burst of flavors to your table. With its creamy coconut milk base, zesty lime, and tender chicken, it’s both satisfying and refreshing. Plus, it’s simple to make, making it a perfect weeknight meal.
The combination of fragrant herbs and spices creates a delightful taste that will transport you straight to Thailand. Whether you’re a seasoned cook or just starting out, this recipe is easy to follow and sure to impress!
Ingredients
- 1 tablespoon vegetable oil
- 1 onion, chopped
- 2 cloves garlic, minced
- 1 tablespoon ginger, minced
- 1 tablespoon red curry paste
- 4 cups chicken broth
- 1 can (14 oz) coconut milk
- 2 cups cooked chicken, shredded
- 1 tablespoon fish sauce
- Juice of 2 limes
- 1 cup mushrooms, sliced
- Fresh cilantro, for garnish
- Lime wedges, for serving
Instructions
- Heat the vegetable oil in a large pot over medium heat. Add the chopped onion, garlic, and ginger, and sauté until fragrant, about 2-3 minutes.
- Stir in the red curry paste and cook for another minute.
- Add the chicken broth and bring to a simmer. Then, pour in the coconut milk and stir well.
- Add the shredded chicken, fish sauce, lime juice, and mushrooms. Let it simmer for about 10 minutes until the mushrooms are tender.
- Serve hot, garnished with fresh cilantro and lime wedges on the side.
Roasted Vegetable Quinoa Salad

This roasted vegetable quinoa salad is a delightful mix of textures and flavors. The nutty quinoa pairs perfectly with the sweetness of roasted veggies and the crunch of nuts. It’s not only tasty but also super easy to whip up, making it a great choice for a quick lunch or a side dish at dinner.
With vibrant colors and fresh ingredients, this salad is as pleasing to the eyes as it is to the palate. It’s gluten-free and packed with nutrients, making it a healthy option for everyone!
Ingredients
- 1 cup quinoa
- 2 cups vegetable broth
- 1 medium zucchini, diced
- 1 red bell pepper, diced
- 1 cup cherry tomatoes, halved
- 1 cup black beans, drained and rinsed
- 1/2 cup corn (fresh or frozen)
- 1/4 cup red onion, finely chopped
- 1/4 cup almonds, chopped
- 1/4 cup fresh parsley, chopped
- 3 tablespoons olive oil
- 1 tablespoon balsamic vinegar
- Salt and pepper to taste
Instructions
- Preheat the oven to 400°F (200°C). Line a baking sheet with parchment paper.
- In a pot, bring vegetable broth to a boil. Add quinoa, reduce heat, cover, and simmer for about 15 minutes or until liquid is absorbed. Fluff with a fork.
- On the prepared baking sheet, toss zucchini, bell pepper, cherry tomatoes, and corn with olive oil, salt, and pepper. Roast for 20-25 minutes until tender.
- In a large bowl, combine cooked quinoa, roasted vegetables, black beans, red onion, almonds, and parsley.
- Drizzle with balsamic vinegar and mix well. Adjust seasoning if needed and serve warm or chilled.
Gluten-Free Pumpkin Bread with Walnuts

This gluten-free pumpkin bread is a delightful treat that captures the essence of fall. With its moist texture and warm spices, it’s perfect for breakfast or a cozy snack. The addition of walnuts adds a nice crunch, making each bite satisfying.
Making this bread is simple and fun! You’ll love how easy it is to whip up, and the wonderful aroma that fills your kitchen will have everyone eager to try a slice.
Ingredients
- 1 ½ cups gluten-free all-purpose flour
- 1 teaspoon baking soda
- ½ teaspoon baking powder
- 1 teaspoon ground cinnamon
- ½ teaspoon ground nutmeg
- ¼ teaspoon salt
- 1 cup canned pumpkin puree
- ½ cup granulated sugar
- ½ cup brown sugar, packed
- ½ cup vegetable oil
- 2 large eggs
- 1 teaspoon vanilla extract
- 1 cup chopped walnuts
Instructions
- Preheat your oven to 350°F (175°C) and grease a 9×5 inch loaf pan.
- In a bowl, mix the gluten-free flour, baking soda, baking powder, cinnamon, nutmeg, and salt.
- In another bowl, combine the pumpkin puree, granulated sugar, brown sugar, vegetable oil, eggs, and vanilla. Mix until smooth.
- Gradually add the dry ingredients to the wet mixture, stirring until just combined. Fold in the walnuts.
- Pour the batter into the prepared loaf pan and smooth the top.
- Bake for 50-60 minutes, or until a toothpick inserted in the center comes out clean.
- Let the bread cool in the pan for 10 minutes, then transfer to a wire rack to cool completely before slicing.
Chocolate Chip Almond Butter Energy Bites

These Chocolate Chip Almond Butter Energy Bites are a tasty and healthy snack that everyone will love. They are sweet, nutty, and packed with energy, making them perfect for a quick pick-me-up during the day. Plus, they are super easy to make, requiring no baking at all!
With the rich flavor of almond butter and the delightful crunch of chocolate chips, these bites are not only gluten-free but also a great way to satisfy your sweet tooth without the guilt. Just mix, roll, and enjoy!
Ingredients
- 1 cup almond butter
- 1/2 cup honey or maple syrup
- 1 cup rolled oats (gluten-free)
- 1/2 cup mini chocolate chips
- 1/4 cup ground flaxseed
- 1 teaspoon vanilla extract
- 1/4 teaspoon salt
Instructions
- In a large bowl, combine almond butter and honey (or maple syrup) until smooth.
- Add rolled oats, chocolate chips, ground flaxseed, vanilla extract, and salt. Mix until well combined.
- Using your hands, roll the mixture into small balls, about 1 inch in diameter.
- Place the energy bites on a baking sheet lined with parchment paper and refrigerate for at least 30 minutes to firm up.
- Once set, enjoy immediately or store in an airtight container in the fridge for up to a week.
Cauliflower Rice Stir-Fry with Vegetables

This Cauliflower Rice Stir-Fry is a delightful dish that’s both healthy and satisfying. With a mix of colorful vegetables, it brings a fresh taste to your table. The cauliflower rice serves as a great low-carb alternative to traditional rice, making it perfect for those looking for gluten-free options.
Simple to prepare, this recipe is great for busy weeknights. Just chop your veggies, sauté them, and mix in the cauliflower rice for a quick meal that’s packed with flavor and nutrients.
Ingredients
- 1 medium head of cauliflower, grated or processed into rice
- 1 cup bell peppers, chopped (red, yellow, and green)
- 1 cup snap peas, trimmed
- 1/2 cup red onion, diced
- 2 cloves garlic, minced
- 2 tablespoons soy sauce (or tamari for gluten-free)
- 1 tablespoon sesame oil
- Salt and pepper to taste
- Green onions, sliced for garnish
Instructions
- Prepare the Cauliflower Rice: Remove the leaves and stem from the cauliflower. Cut it into florets and pulse in a food processor until it resembles rice. Set aside.
- Sauté the Vegetables: In a large skillet, heat the sesame oil over medium heat. Add the red onion and garlic, cooking until fragrant, about 2 minutes.
- Add the Bell Peppers and Snap Peas: Stir in the chopped bell peppers and snap peas. Cook for another 3-4 minutes until they are tender-crisp.
- Mix in the Cauliflower Rice: Add the cauliflower rice to the skillet. Pour in the soy sauce and stir well to combine. Cook for an additional 5-7 minutes, stirring occasionally, until the cauliflower is tender.
- Season and Serve: Taste and adjust seasoning with salt and pepper. Garnish with sliced green onions before serving.
Eggplant Parmesan with Marinara Sauce

Eggplant Parmesan is a delightful dish that brings together layers of tender eggplant, rich marinara sauce, and gooey cheese. It’s a comforting meal that’s both satisfying and full of flavor. This recipe is simple to make, making it perfect for a weeknight dinner or a special occasion.
The combination of crispy baked eggplant and savory marinara creates a delicious balance. Each bite is a warm hug for your taste buds. Plus, it’s gluten-free, so everyone can enjoy it!
Ingredients
- 2 medium eggplants, sliced into 1/2-inch rounds
- 1 teaspoon salt
- 2 cups marinara sauce
- 2 cups shredded mozzarella cheese
- 1/2 cup grated Parmesan cheese
- 1 teaspoon dried oregano
- 1 teaspoon garlic powder
- 1/4 cup olive oil
- Fresh basil leaves for garnish
Instructions
- Prepare the Eggplant: Sprinkle salt on the eggplant slices and let them sit for about 30 minutes. This helps to draw out excess moisture. Rinse and pat dry.
- Bake the Eggplant: Preheat the oven to 400°F (200°C). Brush both sides of the eggplant slices with olive oil and place them on a baking sheet. Bake for 20-25 minutes, flipping halfway, until golden brown.
- Layer the Ingredients: In a baking dish, spread a thin layer of marinara sauce. Layer half of the baked eggplant, followed by half of the mozzarella and Parmesan cheeses. Repeat the layers, finishing with marinara sauce and a sprinkle of oregano.
- Bake the Dish: Cover the baking dish with foil and bake for 25 minutes. Remove the foil and bake for an additional 15 minutes until the cheese is bubbly and golden.
- Serve: Let it cool for a few minutes. Garnish with fresh basil leaves before serving.